Recommended, optional companion: Install Google Earth for a more immersive way to explore discovered locations. TrackLab works without it. PC users can use Earth on the web or optionally install Earth Pro. Get Google Earth.
Three things before you ride
1. Install and sign in
TestFlight access, your TrackLab account and a studio athlete invitation serve different purposes. Start with the beta setup guide below.
2. Confirm your bike
Real training needs compatible equipment and fresh watts and cadence. Discovery and Reaction Test do not need a bike.
3. Select the right athlete
Check the rider before every session. A parent viewing a child’s records is still signed into the parent account.
Screenshots show the actual desktop interface with an isolated example account and no connected hardware. Empty history and connection prompts are intentional; no real athlete records are pictured. Mobile controls may be arranged differently.
TRACKLAB GUIDE
Start testing TrackLab
Sign in for public beta access, connect a compatible Wattbike, and send useful feedback.
Verify your email or recover your password
New accounts verify their email once before signing in. Open the verification email, select Verify email, then return to your original TrackLab app or tab and sign in. Your athlete invitation stays in that original tab. Existing accounts keep their access; verification is not repeated at every login.
Use Forgot password on the sign-in screen to request a reset email. The link lasts 30 minutes and can be used once. After saving a new password, sign in again. Your old password and account sessions stop working.
If a verification email is missing, check spam and use Resend verification email. Wait one minute between requests. Verification links last 24 hours. Correct signup email lets you fix a typo before verification using your existing password.
Parents verify their own email. A child using a parent-managed profile does not need an email address or separate password. Parent-issued child-phone setup links continue to work.
Start your automatic beta access
While public beta enrollment is open, signing in automatically gives a new tester four simultaneous Wattbike connections, including parent-managed athletes using their own phone setup. This works on the native app and website and requires no separate beta invitation or purchase. Access has a fixed end date shown in More → Beta Testing and lasts no more than 90 days. Signing in again does not extend or restore expired or revoked access. Administrators can also issue individual invitations: Each link belongs to one email address, can be accepted once, and expires after seven days. The testing period begins when you accept. The default invitation includes four simultaneous Wattbike connections for 90 days; your invitation may have a different connection allowance or duration.
Step by step
Install the eligible TestFlight build, or open the TrackLab website, then sign in.
Create your own account, or use the parent-managed child-phone setup link for the child. Complete the requested profile details.
Open More → Beta Testing to confirm four Wattbike connections and the access end date. If you have an individual invitation instead, open and accept it using its intended account.
Use this same TrackLab account on your other devices. An account invitation and a TestFlight installation invitation are separate: install the iPhone or iPad beta through the public Download with TestFlight link at the top of this guide. If TestFlight is not installed, install it and return to the public link to accept the beta. No personal download invitation is required.
What the beta includes
Active beta access lets you connect Wattbikes within your allowance, train, upload supported live records, and race available ghosts. Live multiplayer is labeled Coming soon. That pause does not switch off cloud records or ghost racing. TrackLab does not provide race viewing or race broadcasts; ghost racing uses recorded athlete performance data.
Beta access ends on its displayed date or if the administrator revokes it. It does not automatically become a paid subscription. An existing Apple subscription is separate and continues under its own terms. When both entitlements are active, TrackLab uses the larger connection allowance, up to four; the allowances do not add together. Ending beta access does not itself delete your saved profile or history.
A useful beta test session
Try the features that match your equipment and account. Note the device and approximate time of a problem so the team can follow the same steps.
Discovery: find a BMX track, open a nearby bike shop, then open a nearby track from that shop. Check directions, listed contact details, and your Back navigation.
Connection: pair your Wattbike, verify fresh watts and cadence, complete a short activity, and confirm the result appears in your training history.
Explore: build one Smart Route and one route from a typed Starting location and Destination. Try pause/resume and Recent routes.
Reaction Test: check the complete tree and gate, the stopped light, gate motion, and drop/return sounds on your device.
Records: review a compatible ghost, your session details, and an export. Sign into the same account on another device to confirm saved data is available.
Family: with permission, add separate athlete profiles, switch between their names, and confirm that each view contains only that athlete’s records. Check existing-account approval and removal of sharing.
BMX Race Intervals: try a mapped course at Wattbike level 1. Tell us how the interval rhythm feels and flag outdated mapping; pedal zones approximate typical pedaling areas from available imagery.
Prepare your bike and report an issue
For a Wattbike Trainer or Pro, compatibility depends on its monitor, enabled wireless services, and the device running TrackLab. Put a compatible monitor in Just Ride, enable the relevant Bluetooth settings, and pedal to wake it. Native iPhone/iPad pairing differs from browser pairing; consult the connection guide for your platform. A model name or country alone does not guarantee that every monitor and firmware combination has been validated.
Step by step
Check that the expected bike appears and its live cadence and power respond before beginning a test.
Open More → Beta Testing → Send beta feedback. Your email app opens a draft that you review before sending.
Include what you expected, what happened, the steps to reproduce it, device and operating system, bike monitor and connection method, and whether it happened in a demo or a live ride. Add screenshots when helpful.
TRACKLAB GUIDE
Connect your Wattbike
Prepare your Trainer or Pro, choose the right connection, and confirm live riding data.
Get ready to ride
Use a Wattbike Trainer or Pro with a monitor that supplies compatible Bluetooth data. Compatibility depends on the monitor and its firmware; the bike model alone does not guarantee that every connection works. Sign in to the account with your active beta access or Wattbike membership.
You can ride away from the studio wherever you have internet, your compatible bike, and a supported local connection. Keep the phone, tablet, or supported computer near the bike. Internet provides maps and account services; your nearby device receives the bike signal.
Step by step
Wake the Wattbike monitor. On Model B, open Settings → Remote → Bluetooth On when using Bluetooth.
Enter Just Ride and pedal for a few seconds. Level 1 is the standard shared race starting setup; follow the selected activity’s AIR instructions afterward.
Close Wattbike Hub or another app using that monitor if TrackLab cannot connect. Disconnect the bike from other devices before trying direct pairing.
Pair directly with Bluetooth
The native TrackLab iPhone/iPad app uses a native Bluetooth device list. Desktop Chrome or Edge, and supported Android Chrome devices, use the browser’s Bluetooth chooser. Allow Bluetooth permission when requested.
Safari and Chrome websites on iPhone/iPad cannot pair Wattbikes directly. Use the native TrackLab app for direct pairing.
Step by step
Choose Bluetooth in the sidebar, then Pair Wattbike.
Choose first Wattbike opens the device chooser. Select the Wattbike or its monitor serial; Windows may show other nearby devices too.
Pedal in Just Ride and confirm live watts and cadence. A paired status alone does not confirm that the monitor is sending fresh riding data.
Use Choose another Wattbike or Pair Another Wattbike for additional authorized bikes, then select Done. Your account’s connection allowance applies, up to four bikes.
Previously approved bikes attempt to reconnect automatically. Use Reconnect saved bikes if needed, with the monitors awake and nearby.
Check the numbers and report a connection issue
Watts and cadence come from the monitor when available. Virtual speed depends on the activity’s riding model and can differ from the monitor’s speed. Explore needs both fresh cadence and power to propel the rider; a connection supplying only one can appear paired without moving the map.
TrackLab’s AIR instructions ask you to move the physical lever. They do not automatically change the bike’s resistance. A USB cable alone is not a general replacement for the supported Bluetooth connection.
For feedback, include Trainer/Pro model, monitor model and firmware, device/OS/browser, native app versus website, and whether Bluetooth pairing completes.
Include the exact status or error, number of connected bikes, whether watts and cadence change while pedaling, and a screenshot with the approximate time.
TRACKLAB GUIDE
Train your start, sprint, and power
Choose a skill drill or a mapped Wattbike session, then review the result.
Reaction Test
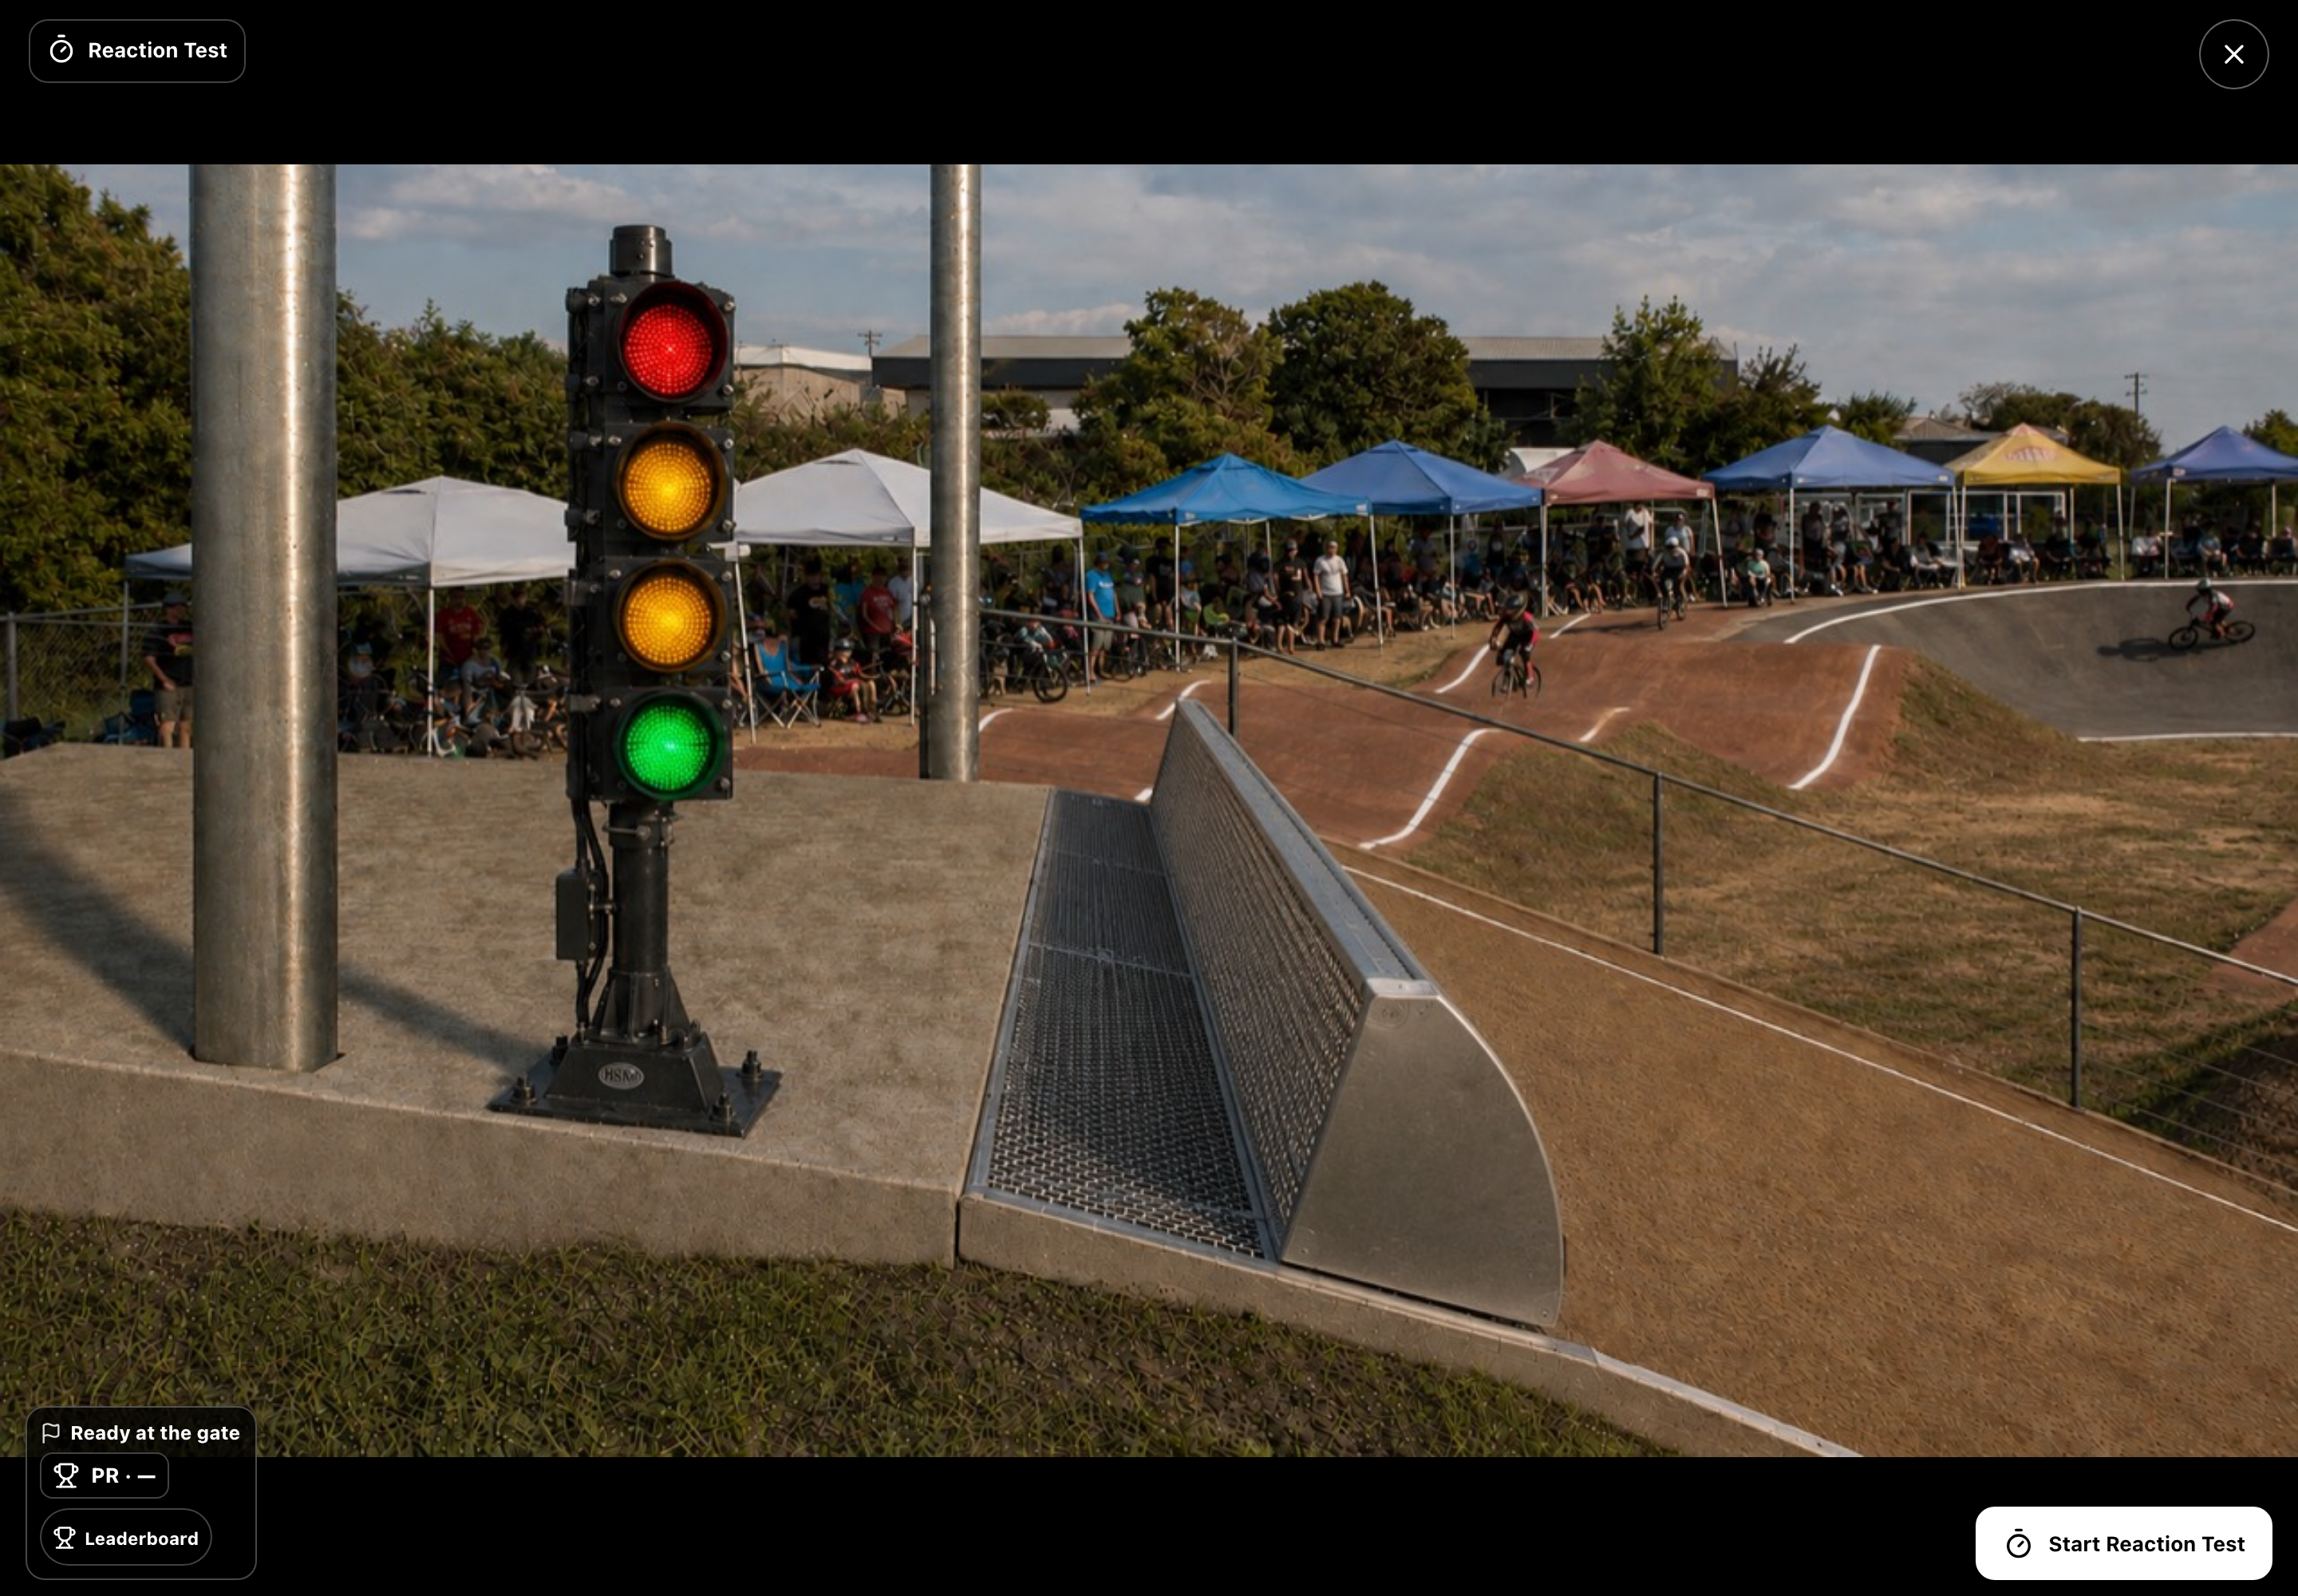
Reaction Test ready screen. Start the test with the bottom control. Select the image to view full resolution.
Practice your response to the randomized start sequence using the four-light tree and moving gate. Start the test, then tap the reaction area after the first red light to record your response. A keyboard can use Space or Enter. Timing is measured from the first red tone, and the result identifies the light reached when you reacted.
Your card shows Average PR (your best average of three consecutive valid attempts) and Single best (your fastest individual attempt). After every completed group, Group average shows that group’s result and the difference from Average PR, even when it is slower. Only Average PR ranks on the leaderboard. A false start resets the unfinished group to zero; completing three attempts starts a new group. Leaving Reaction Test starts a fresh group. Previous single-attempt leaderboard scores do not qualify. Times are measured from the first red tone and displayed to thousandths of a second. Use Hide my time or Show my time to control your entry. Free and paid accounts are eligible.
Step by step
Open Reaction Test. Check that the complete light tree and gate are visible and turn your device volume up if you want sound.
Select Start Reaction Test. Wait for the randomized sequence; react after the first red signal by tapping the reaction area, or using Space/Enter on a keyboard.
Read the reaction time and the illuminated light that marks your response. A false start is not a valid personal best.
Choose Try Again for another attempt. Open Leaderboard to compare your best three-attempt average, or hide your entry.
BMX Race Intervals
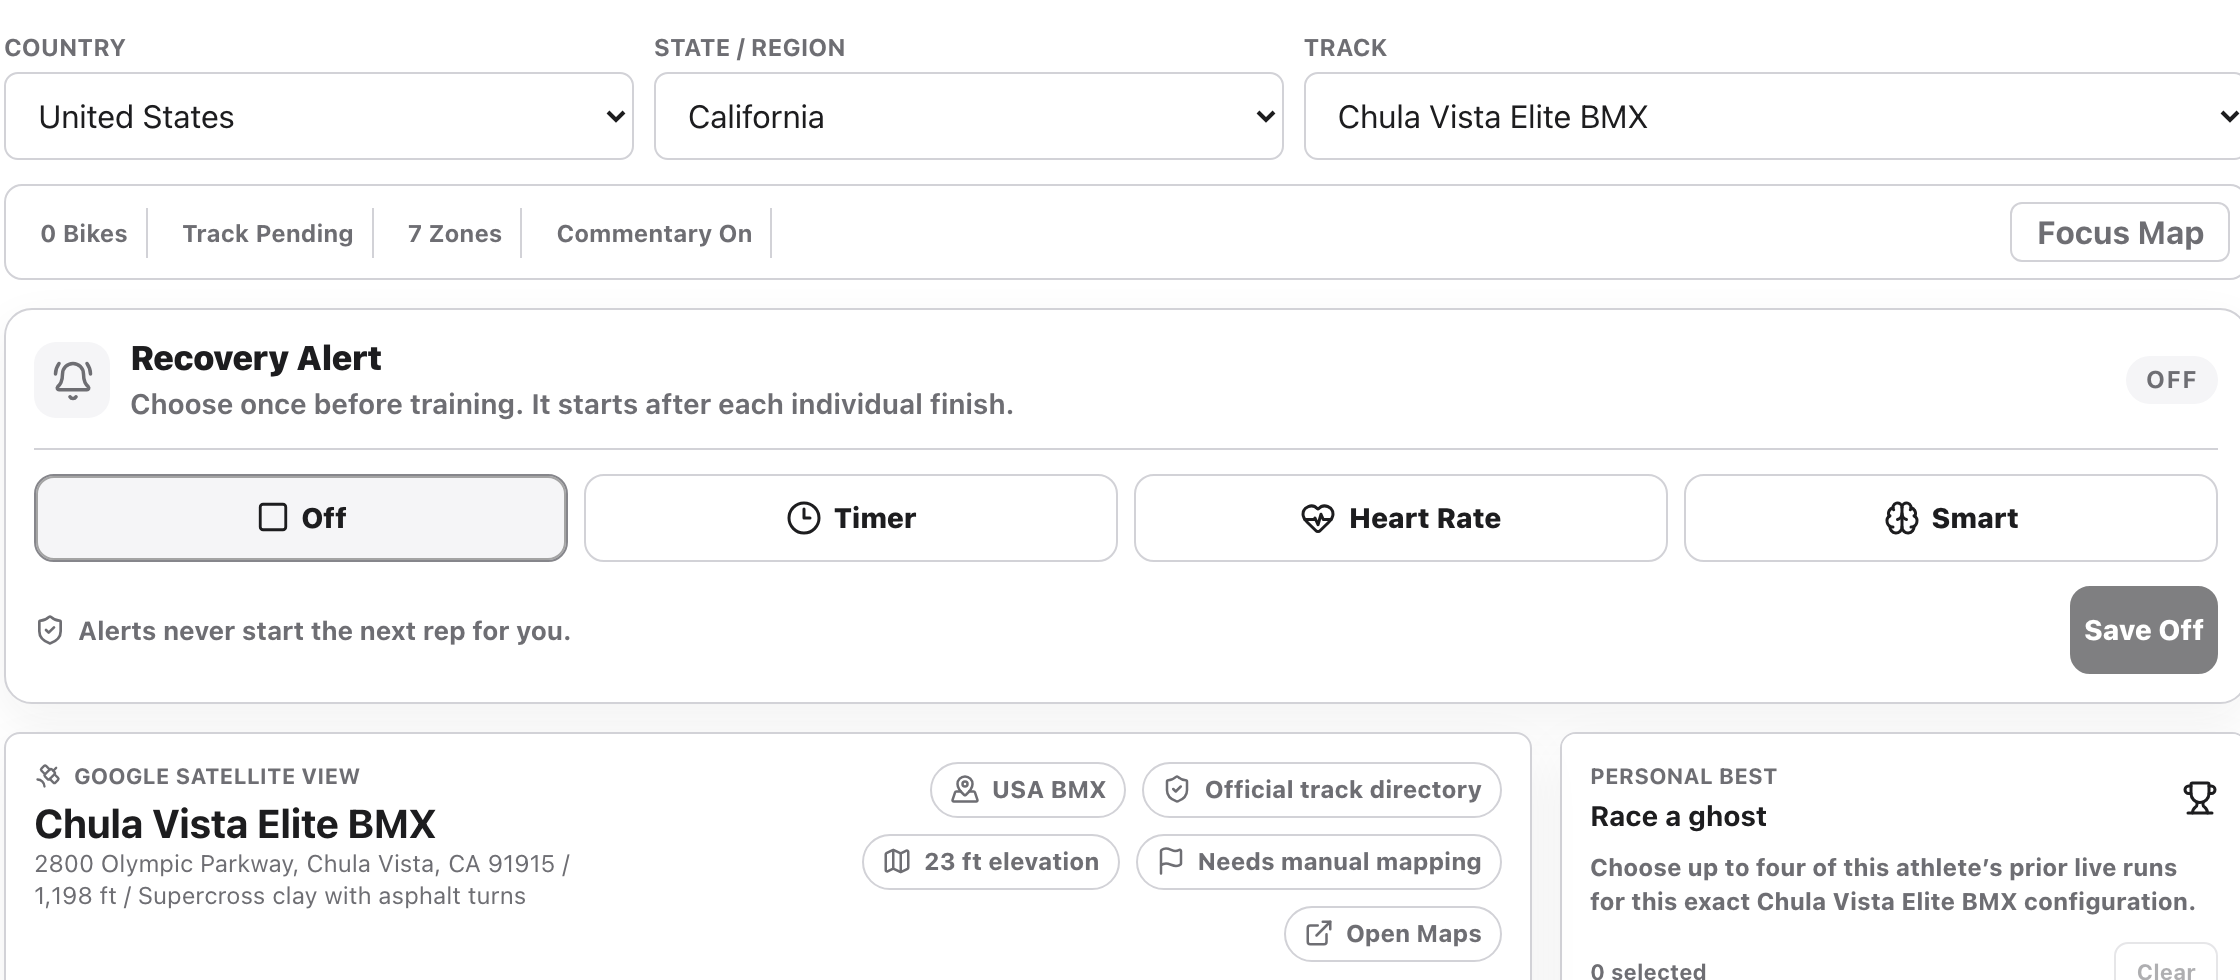
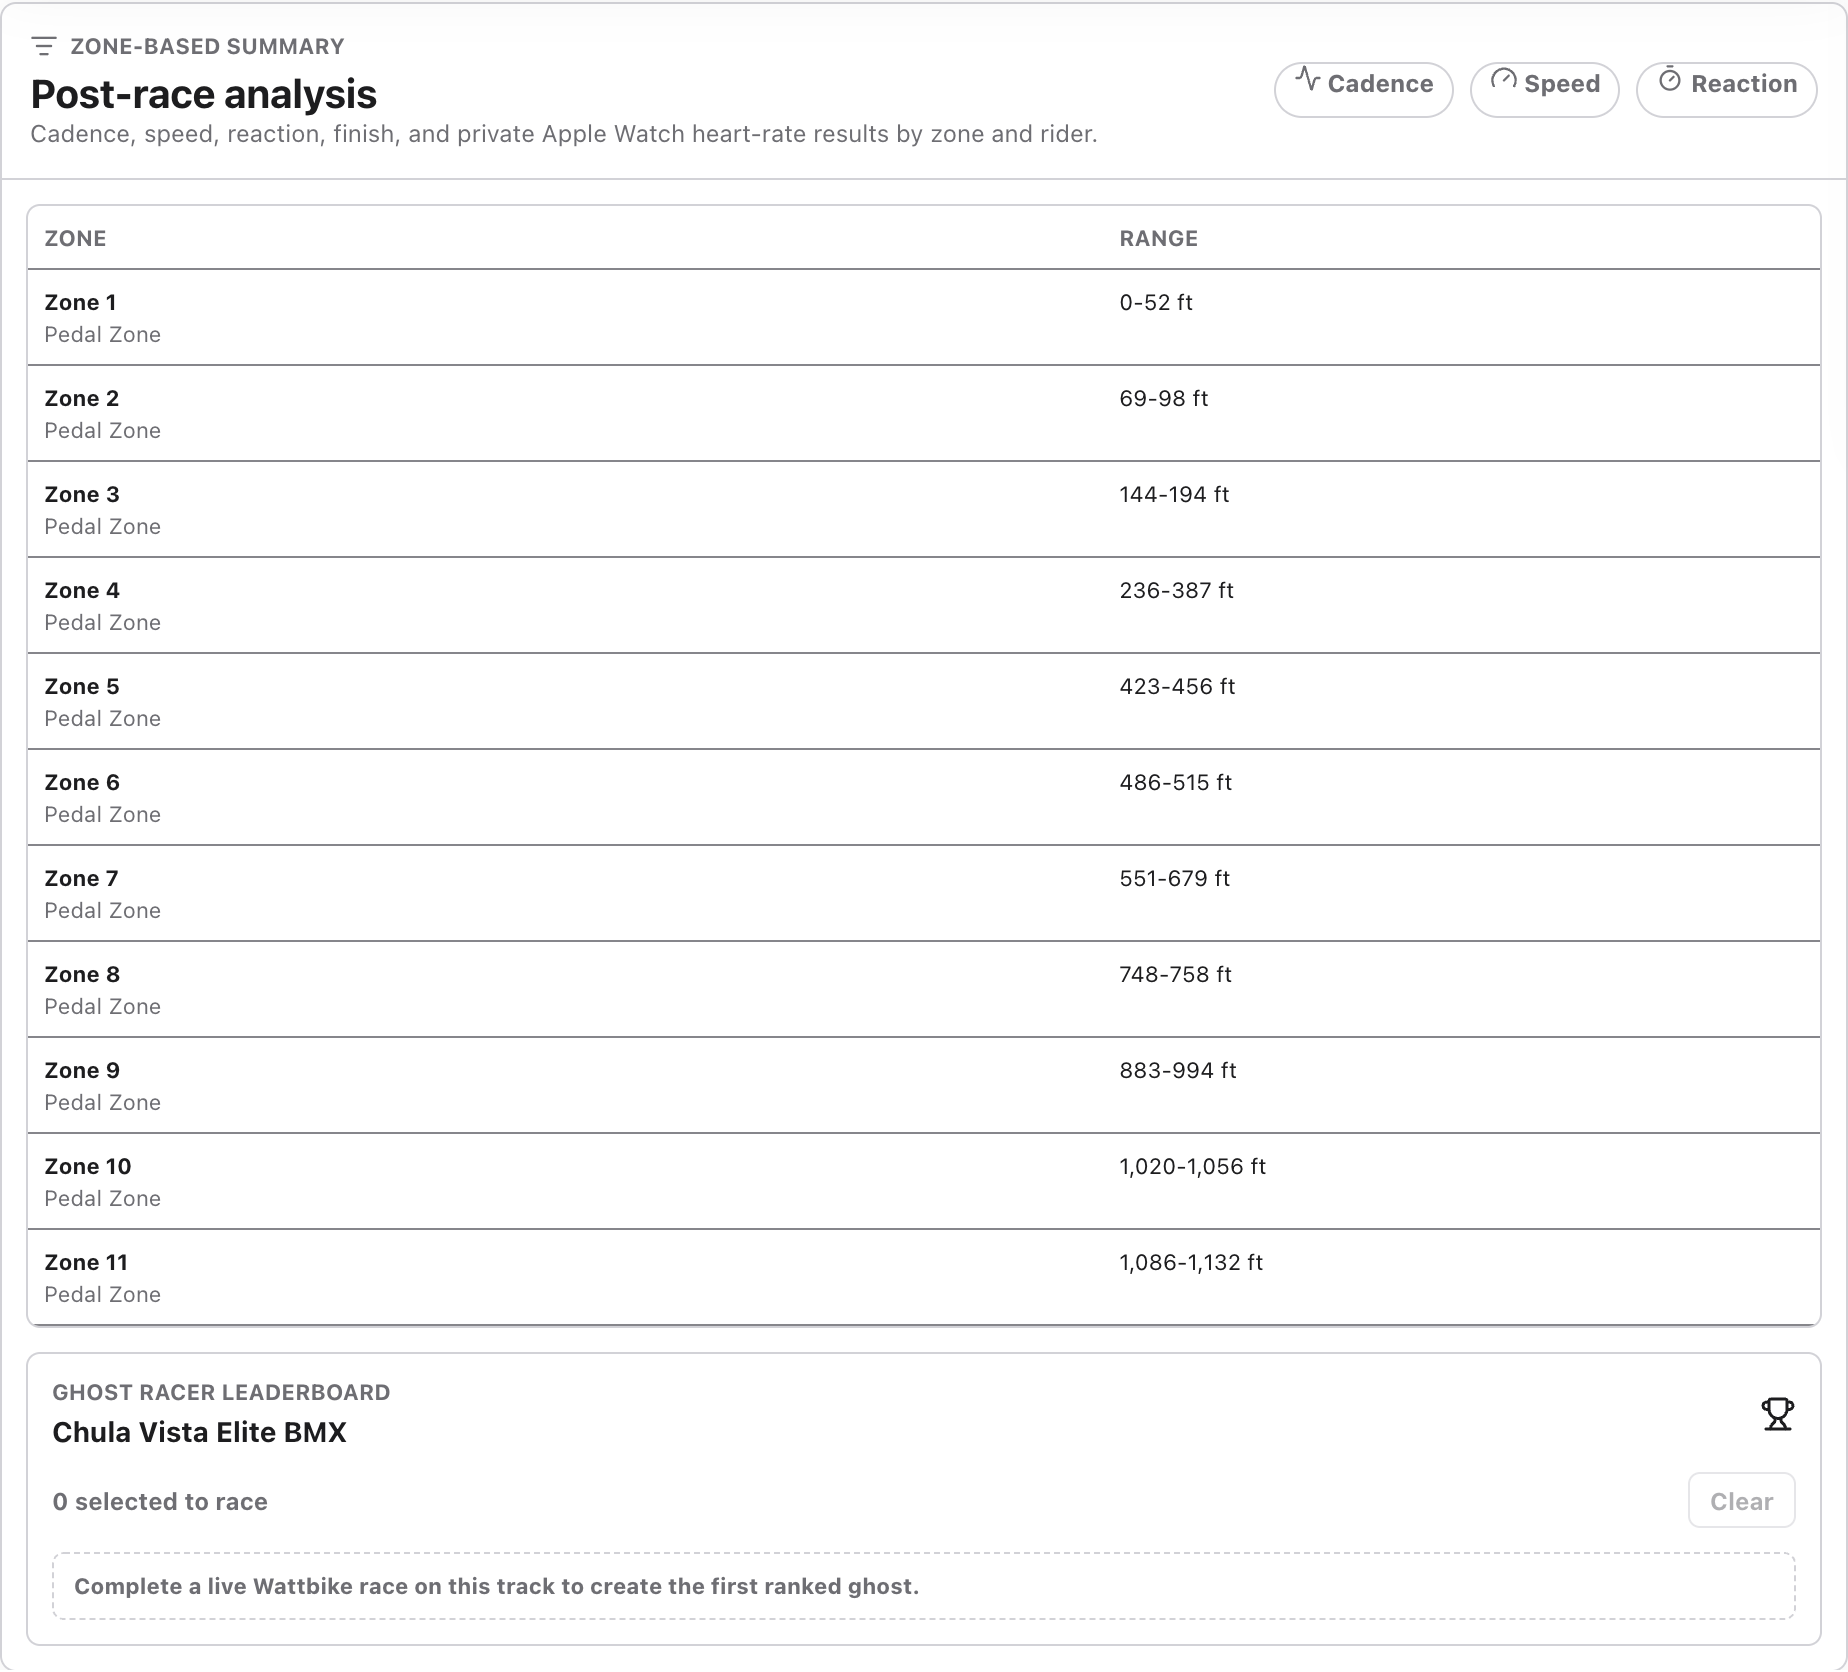
Actual Chula Vista Elite BMX mapping in California: saved ride line and 11 numbered pedal zones. No connected riders or invented results. Select the image to view full resolution.
Choose Ready to race in BMX Race Intervals to see the currently playable mapped courses. All tracks · Request mapping keeps the complete directory available: search by track, state, or country, then choose Request mapping for an unmapped track. A checkmark confirms the request and the team receives an email. Requests are saved to your account; a future release date is not guaranteed.
BMX Race Intervals is a fun way to practice intervals using mapped BMX tracks. Pedal zones represent typical places a rider might pedal, based on the imagery available when the course was mapped. They are approximate: track layouts may have changed, and the mapping is not an exact reproduction of every current track or riding line.
Results use numbered labels: Zone 1, Zone 2, Zone 3, and so on. These are the saved mapped pedal zones, not named section timings such as first straight or rhythm section. Screenshots must show the actual selected track and its published mapping.
For BMX Race Intervals, we recommend setting your Wattbike to level 1 using its physical Air resistance control. TrackLab does not change that control for you. The activity is designed to help riders practice the rhythm of pedaling and recovery around a BMX track, with the aim of improving pedaling efficiency; improvement is not guaranteed.
Choose an available mapped BMX course, assign the riding athletes to their connected bikes, and work through the race setup. The course’s pedal zones and coasting or technical sections shape the session. The start sequence launches the race, and rider progress and results follow the mapped course.
Courses with saved alternatives offer Amateur or Pro layouts and race lines. Pro branches retain their speed requirement at the split. Loop courses support 1–20 laps, with pedal zones repeating each lap. Optional Race commentary and Ambient track sound have separate controls; spoken commentary depends on service availability.
Step by step
Connect your bike and confirm fresh watts and cadence. Choose BMX Race Intervals and set your Wattbike’s physical Air resistance control to level 1.
Select an available mapped course and its offered layout. Assign each connected bike to the athlete riding it. Confirm the athlete before starting so the result is attributed correctly.
Review the displayed race configuration, available lap count and compatible ghosts. Set the physical Wattbike resistance as instructed.
Start the configured race and follow the gate sequence. Ride the marked pedal zones and follow the course’s coasting or technical sections.
After finishing, review the zone analysis and check the saved result in the athlete’s history. Change the configuration only after reviewing the current effort.
Straight Sprint
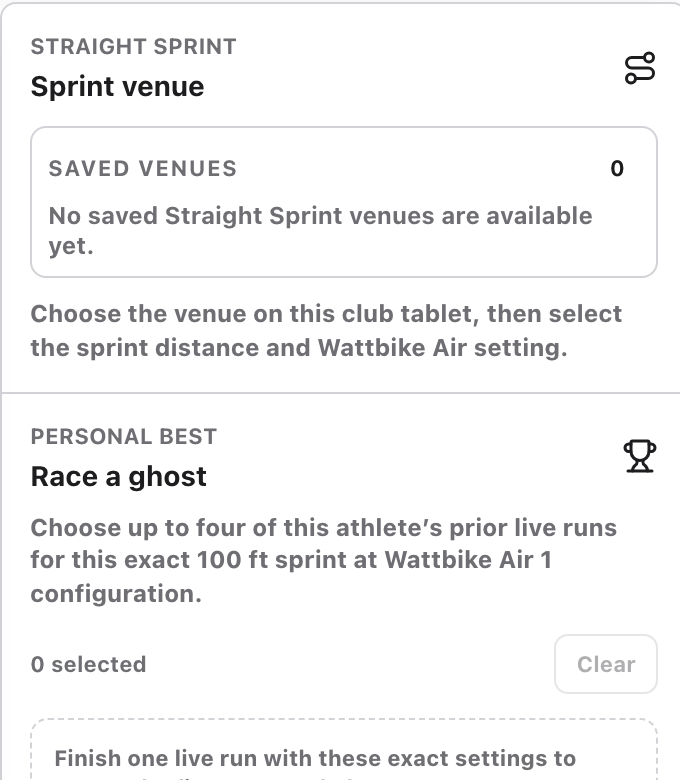
Straight Sprint venue and ghost selection panel. This example account has no saved venue; choose an available venue in your own account. Select the image to view full resolution.
Choose a saved sprint venue, distance, and Wattbike Air setting. Available distances are 30, 100, and 145 feet, followed by 200–1,500 feet in 100-foot steps. The saved route must be long enough for your selected distance. Only that distance’s finish line appears during the sprint.
Select the physical Air setting you are using, from 1–10. This records your setup; it does not move the bike’s resistance control. Sprint records and ghosts match the selected distance and Air setting. Creating sprint venues and editing course mappings are administrator tools; testers can choose the saved venues available to them.
Step by step
Connect the Wattbike, confirm live input, and open Straight Sprint.
Choose an available saved sprint venue. Select a supported distance that fits its saved route.
Select the Air setting matching the physical lever and assign the riding athlete. Choose only ghosts that match the distance and Air setting.
Start the sprint using the screen’s start control and follow its sequence. Sprint through the selected finish line.
Review the time and performance data; confirm the result in the correct athlete’s saved history before starting another effort.
Get Pulled
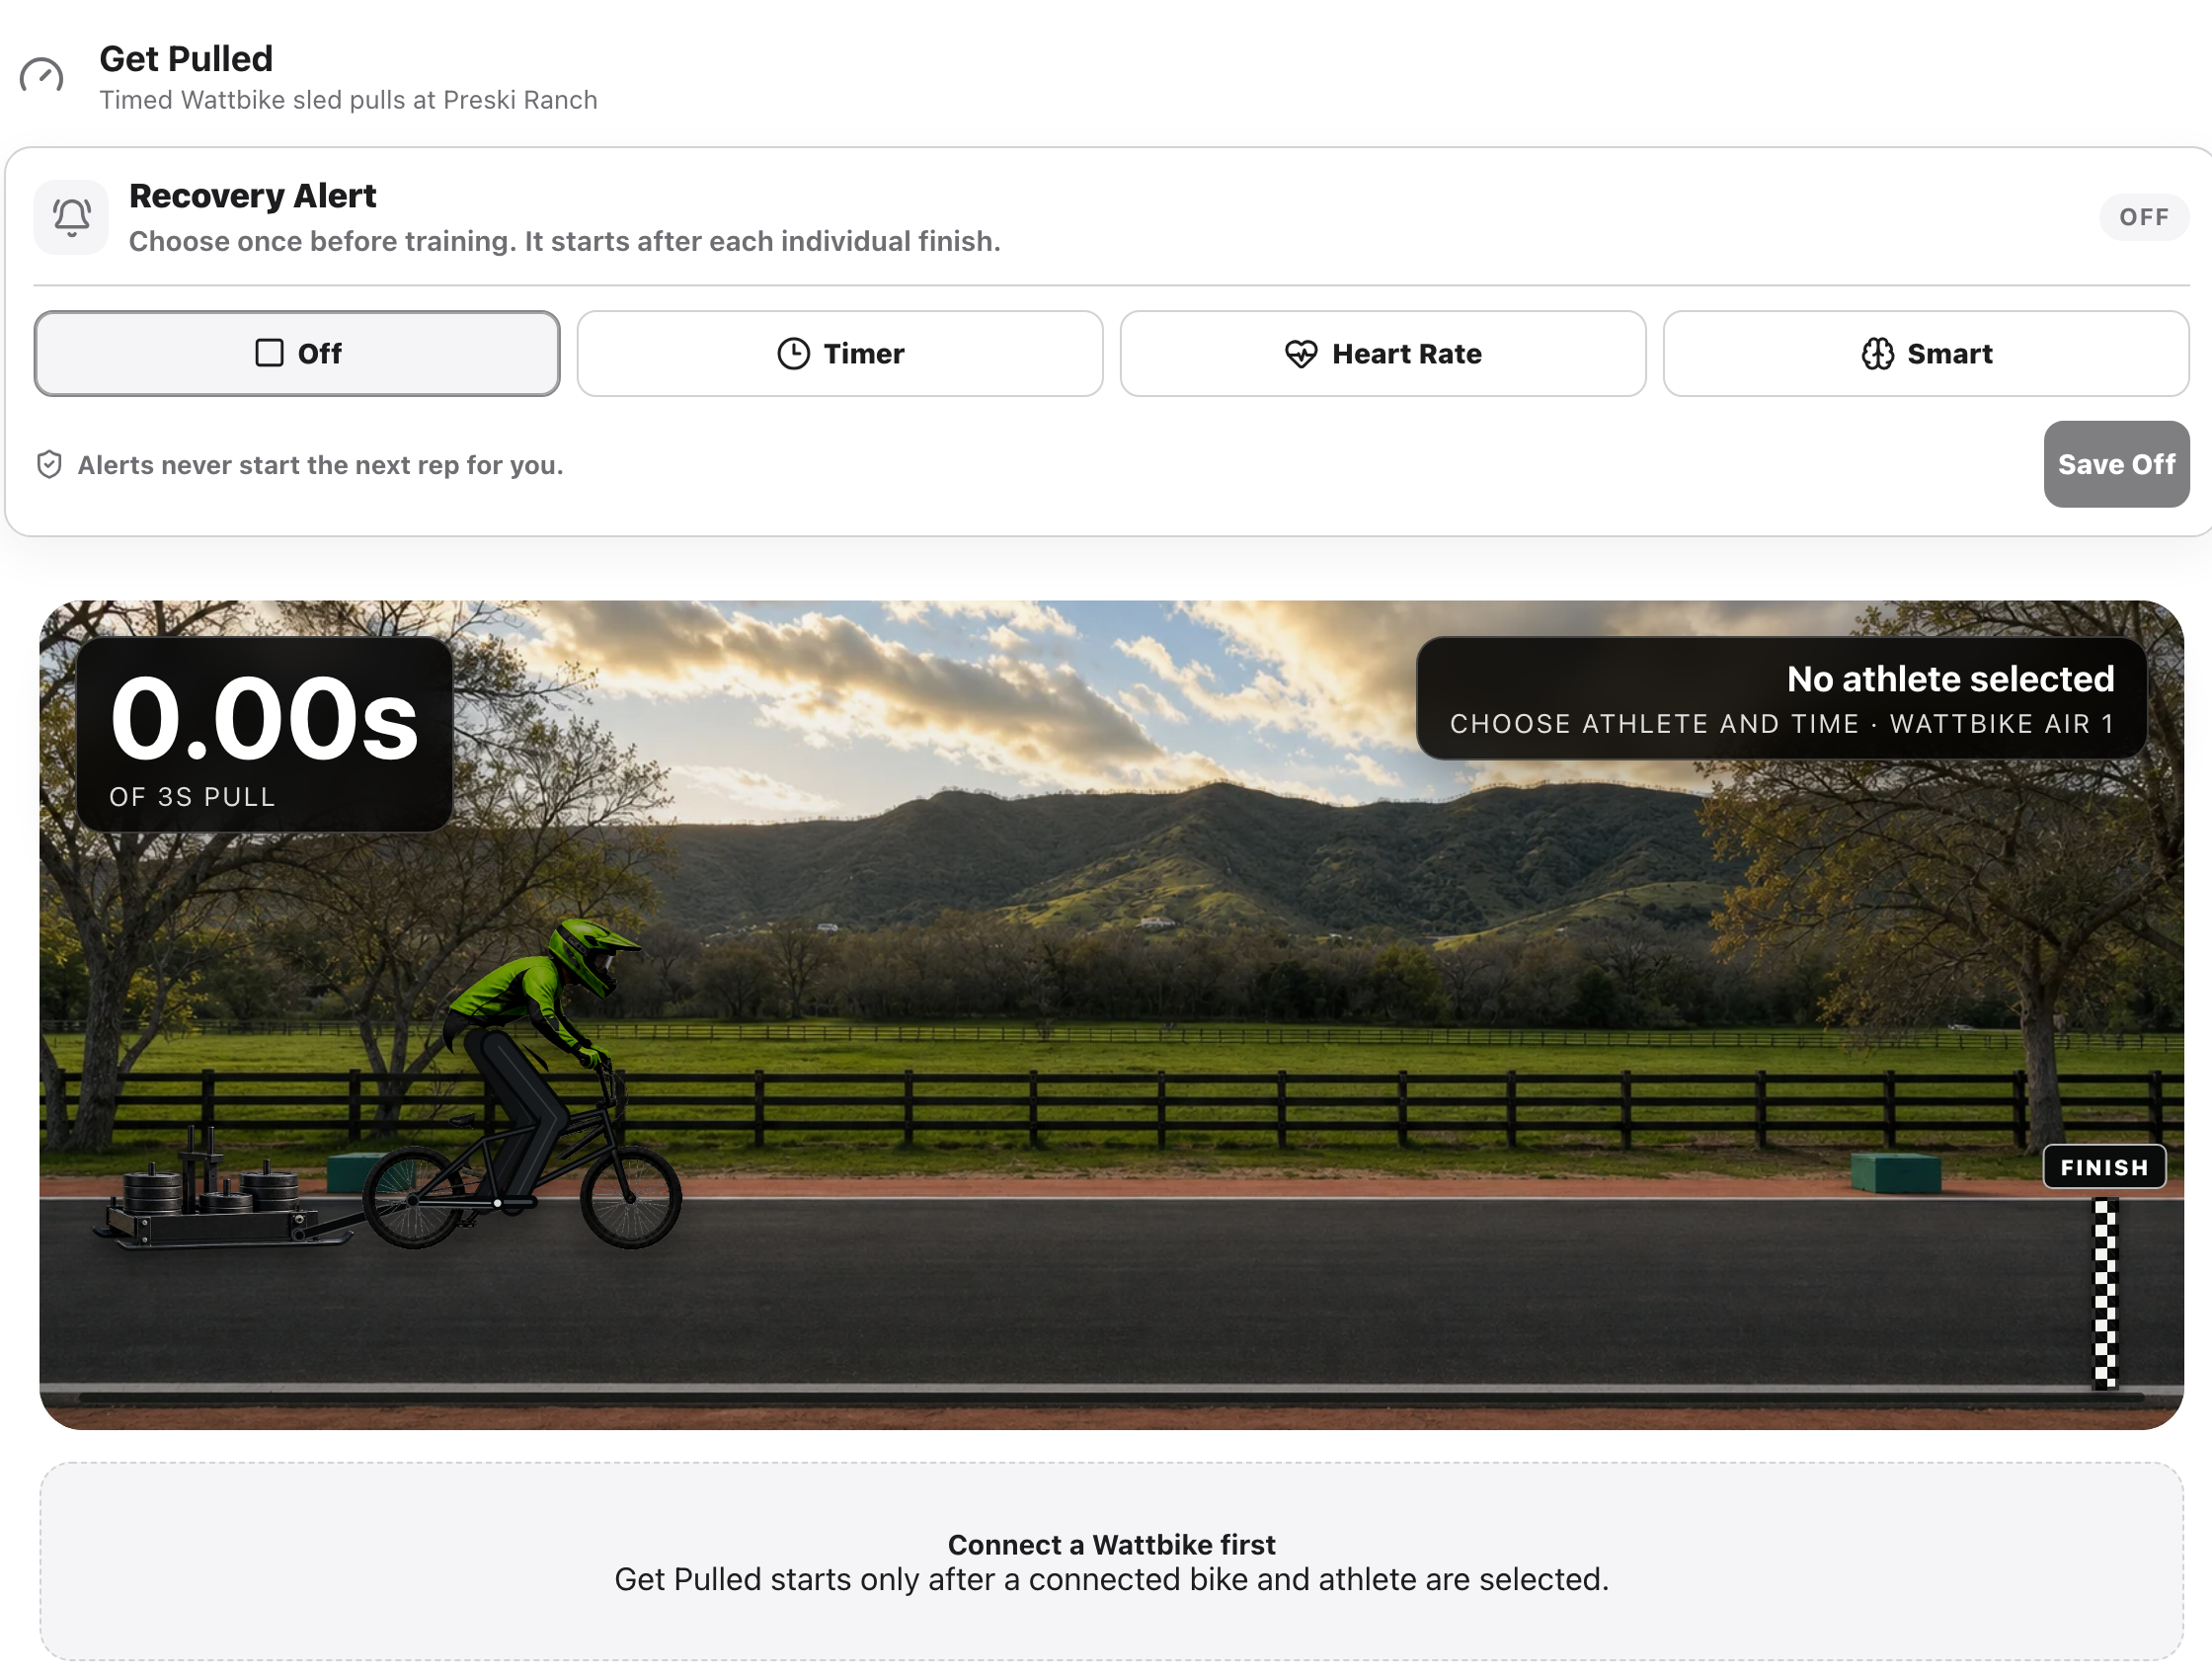
Get Pulled entry screen. Pair a bike and select an athlete to enable the pull setup. Select the image to view full resolution.
Use this timed Wattbike drill to test power and cadence against the sled scene. Select a connected bike and athlete, choose a 3-, 6-, or 30-second preset or a custom duration from 1–300 seconds, and record the physical Air setting. After the six-second countdown, the drill waits for the first 1-watt power signal before timing the pull.
Watch watts, cadence, and speed during the effort, then review averages, peak watts, peak cadence, and the athlete’s maximum-watts personal record. Power results are private to the selected athlete and authorized club monitors. Demo pulls use simulated data and are not saved to athlete history or published.
Step by step
Open Get Pulled with live Wattbike input. Select the bike and the athlete riding it.
Choose 3, 6 or 30 seconds, or Custom for a duration of 1–300 seconds. Set the displayed Air value to match the physical lever.
Select the Start pull control. Let the six-second countdown finish. The timed pull begins when the monitor sends the first power signal of at least 1 watt.
Keep riding through the timed effort. Watch the power and cadence values; the app does not move your resistance lever.
Review average and peak values and the selected athlete’s record. Check the athlete history for the completed real pull.
Actual Chula Vista mapped zones: Zone 1 through Zone 11. The ranges come from the published mapping; this example has no recorded rider results. Select the image to view full resolution.
TRACKLAB GUIDE
Explore the World
Build a real-world virtual route, pedal through satellite maps, and continue your ride later.
Find an experience with Smart Route
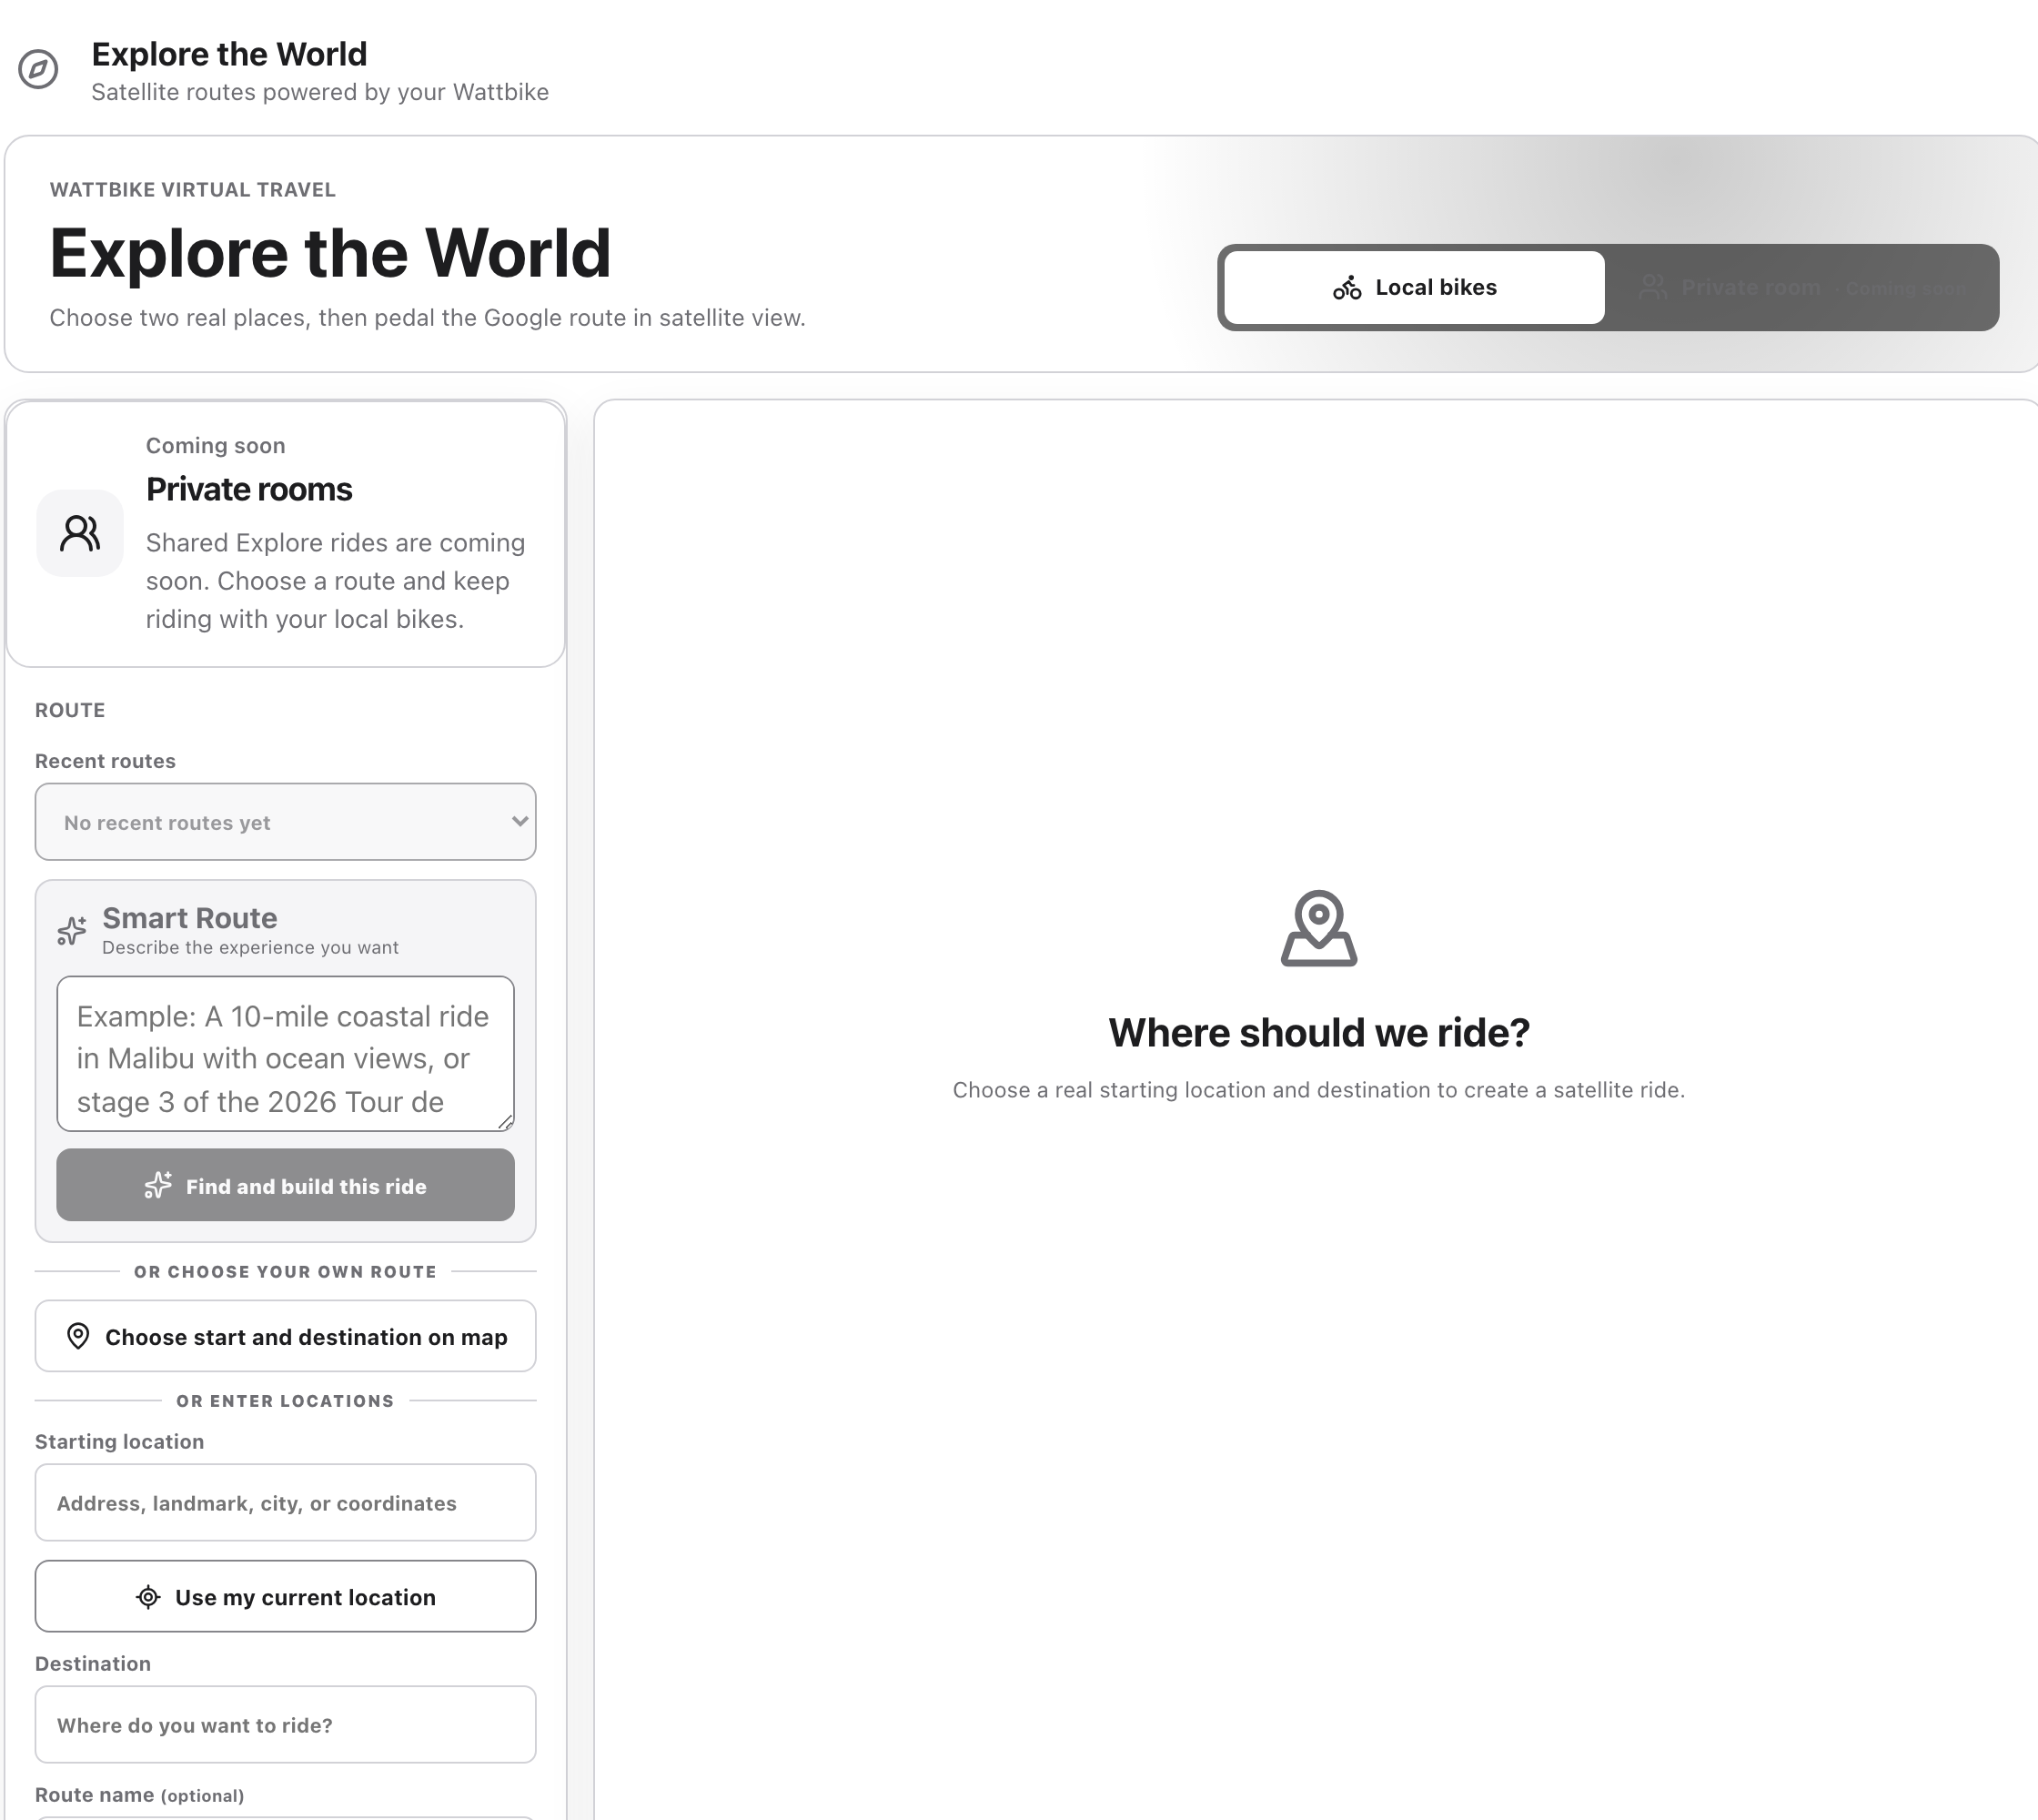
Explore route setup: describe a Smart Route or enter your own locations. Select the image to view full resolution.
Open Explore the World and use Local bikes. Assign each connected bike its Rider profile, or choose Use Wattbike name. Private room shows Coming soon during beta.
Smart Route researches one ride from your description. Include a location, approximate distance, scenery, a loop, or an event stage and year. Examples: “A 10-mile coastal ride in Malibu with ocean views” or “Stage 3 of the 2026 Tour de France.” Distance and event-course matches may be approximate.
Step by step
Enter your request in Describe your Smart Route, then select Find and build this ride.
Review the map, start, finish, actual Route distance, description, and any Research sources. Google estimate is a route estimate, not your guaranteed finishing time.
Refine the request if needed. Explore does not have a separate curated-route catalog or distance/difficulty filter; describe those preferences in your request.
Choose your own start and destination
For a specific journey, enter Starting location and Destination. Use an address, landmark, city, or coordinates, and choose the matching suggestion when offered. Use my current location can fill the start after location permission; type it instead if permission is unavailable.
After editing locations, select Build again to update the displayed map. Routes use Google bicycle routing for indoor virtual riding, not outdoor navigation.
Step by step
Optionally add a Route name, then select Build Explore the World route.
Alternatively, choose Choose start and destination on map. Tap the start and finish; Set start and Set destination change which point you place next.
Pan or zoom to the desired place. Start over clears the points. Choose Use these map points, then Build Explore the World route.
Start, pause, and continue
Review distance, elevation gain and descent before starting. Built routes are remembered automatically in Recent routes, which keeps up to eight routes for reuse. This list is separate from completed ride history.
Step by step
Confirm your connected riders, then select Start Explore the World ride. The ride opens full screen; pedal to move.
Use Pause and Resume ride to take a break. Exit full screen changes the view; Reset clears the current ride progress.
When a local real ride is backgrounded, it pauses and saves a recovery checkpoint on that device. Return, reconnect if needed, and use Resume ride. Recovery depends on that device’s saved storage.
At Route complete, choose Ride again, Reverse route, or New destination. New destination uses the previous finish as the next start; build the next route before riding.
Terrain, maps, and your records
Explore calculates virtual speed from cadence with gradual acceleration, hills, and coasting. Watch distance, speed, average speed, progress percentage, and available heart rate on the rider cards. AIR 1–10 recommends a manual air-lever setting for the grade. If grade is unavailable, the app shows its retry status and recommends minimum.
The standard view is Google satellite. Use Follow zoom, Behind/Centered/Ahead, Free camera/Auto camera, North up/Travel up, and Miles/Kilometers to adjust it. Maps split automatically when local riders spread apart. Street names enables labels and interactive landmarks; available place details and Street View can open while the ride continues.
Review completed real rides in My Profile’s training calendar. Recent routes reopens routes, while recovery checkpoints resume unfinished local progress on the same device. If a Demo is shown, its riders and metrics are simulated; Explore demo rides do not create real training records.
Preview a destination with Google Earth
When browsing bike shops, open a nearby BMX track and use its Google Earth link to explore the area. For Explore the World, use Google Earth separately to preview a destination; Smart Route search and the ride itself run in TrackLab. Installing Earth does not change TrackLab’s built-in maps, automatically import routes, or sync your training records to Google Earth.
On a PC, Google Earth on the web works without an installation. Earth Pro is an optional desktop download; TrackLab’s links open the web version rather than controlling Earth Pro. Imagery and 3D coverage vary by location.
TRACKLAB GUIDE
Find tracks and bike shops
Plan a BMX visit, explore the surroundings, and find nearby shops in either direction.
Recommended companion: Google Earth (optional)
We highly recommend installing Google Earth on your phone or tablet if you enjoy exploring the places you discover in TrackLab. It is an optional companion for a more immersive look at satellite imagery and available 3D terrain—not a requirement for TrackLab, Wattbike training, or recording results.
In BMX Tracks, select a track and choose Google Earth. TrackLab passes that track’s coordinates to Google Earth through a web link. Your device may open the browser or offer to open the installed app. If it stays in the browser, you can also search for the track in Google Earth. Return to TrackLab to train or review your data.
When browsing bike shops, open a nearby BMX track and use its Google Earth link to explore the area. For Explore the World, use Google Earth separately to preview a destination; Smart Route search and the ride itself run in TrackLab. Installing Earth does not change TrackLab’s built-in maps, automatically import routes, or sync your training records to Google Earth.
On a PC, Google Earth on the web works without an installation. Earth Pro is an optional desktop download; TrackLab’s links open the web version rather than controlling Earth Pro. Imagery and 3D coverage vary by location.
Step by step
Use the official Google Earth download page linked above to choose the version for your device.
Select a BMX track in TrackLab, then choose Google Earth to explore its location.
Zoom and tilt where supported, then return to TrackLab for activities, route search, and saved results.
Find your next BMX track
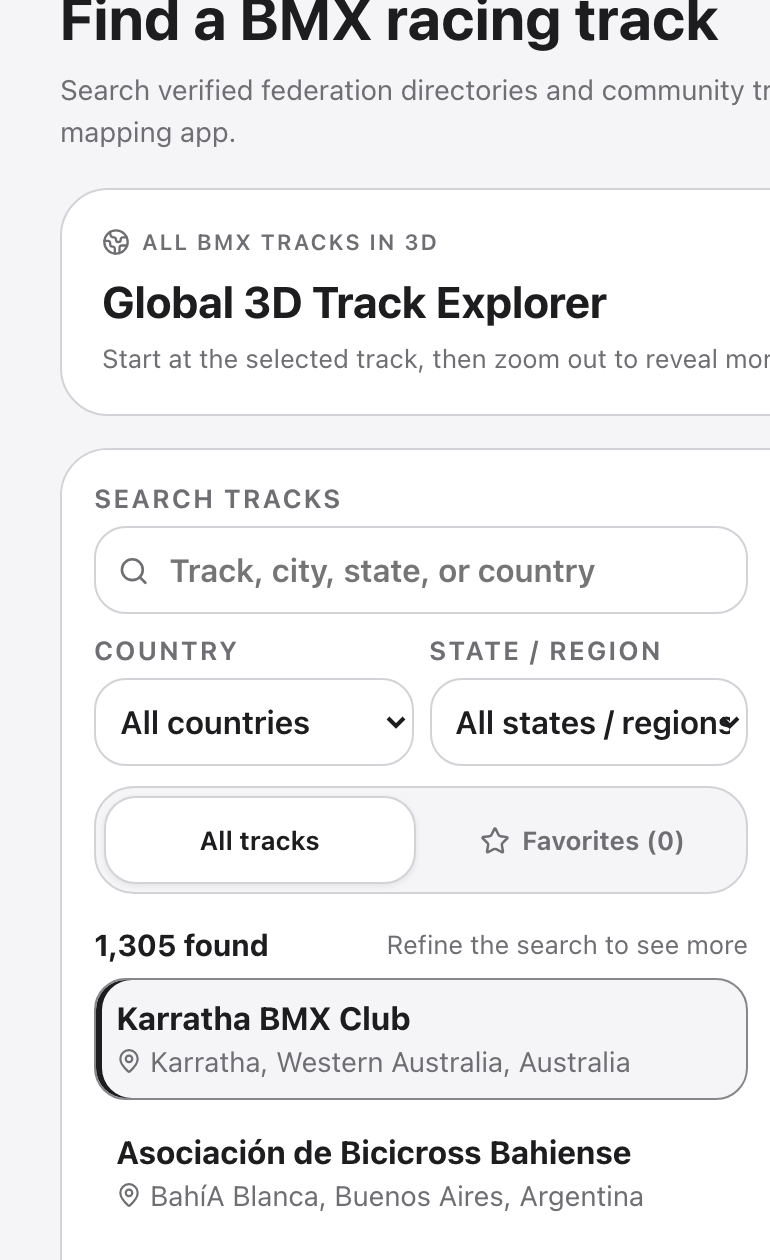
BMX track directory and its search controls. Select the image to view full resolution.
Open BMX Tracks to search the public directory by track name, city, state, or country. Narrow the list with the Country and State / region filters, then choose a track to see its location on satellite imagery. You can browse the directory without an account.
Track details include the listed address and source, plus available official website, federation, phone, and social links. Use Maps for Google Maps directions or Google Earth to explore the location in 3D. The global directory includes places to visit; training uses the courses that have a saved race mapping.
Sign in to save favorite tracks and return to them through Favorites.
Copy a track link or share a track with a TrackLab friend. Received tracks appear in Friends under Shared tracks.
Directory records combine federation directories and community sources. Contact and location details depend on the information available for each track.
Explore tracks and shops together in 3D
Select a track, then choose Explore all tracks in 3D. The Global 3D Track Explorer starts there; zoom out to reveal more named red track pins. Select another track pin to open its details, toggle map labels and boundaries, or use Return to track to go back to your starting view.
Turn on Bike shops to add clickable blue shop pins. Zoom closer if the explorer asks you to, then select a pin to open the shop directory. Maps and 3D imagery depend on service and device availability; a Google Earth link remains available if the in-app 3D view cannot open.
Search the global bike shop directory
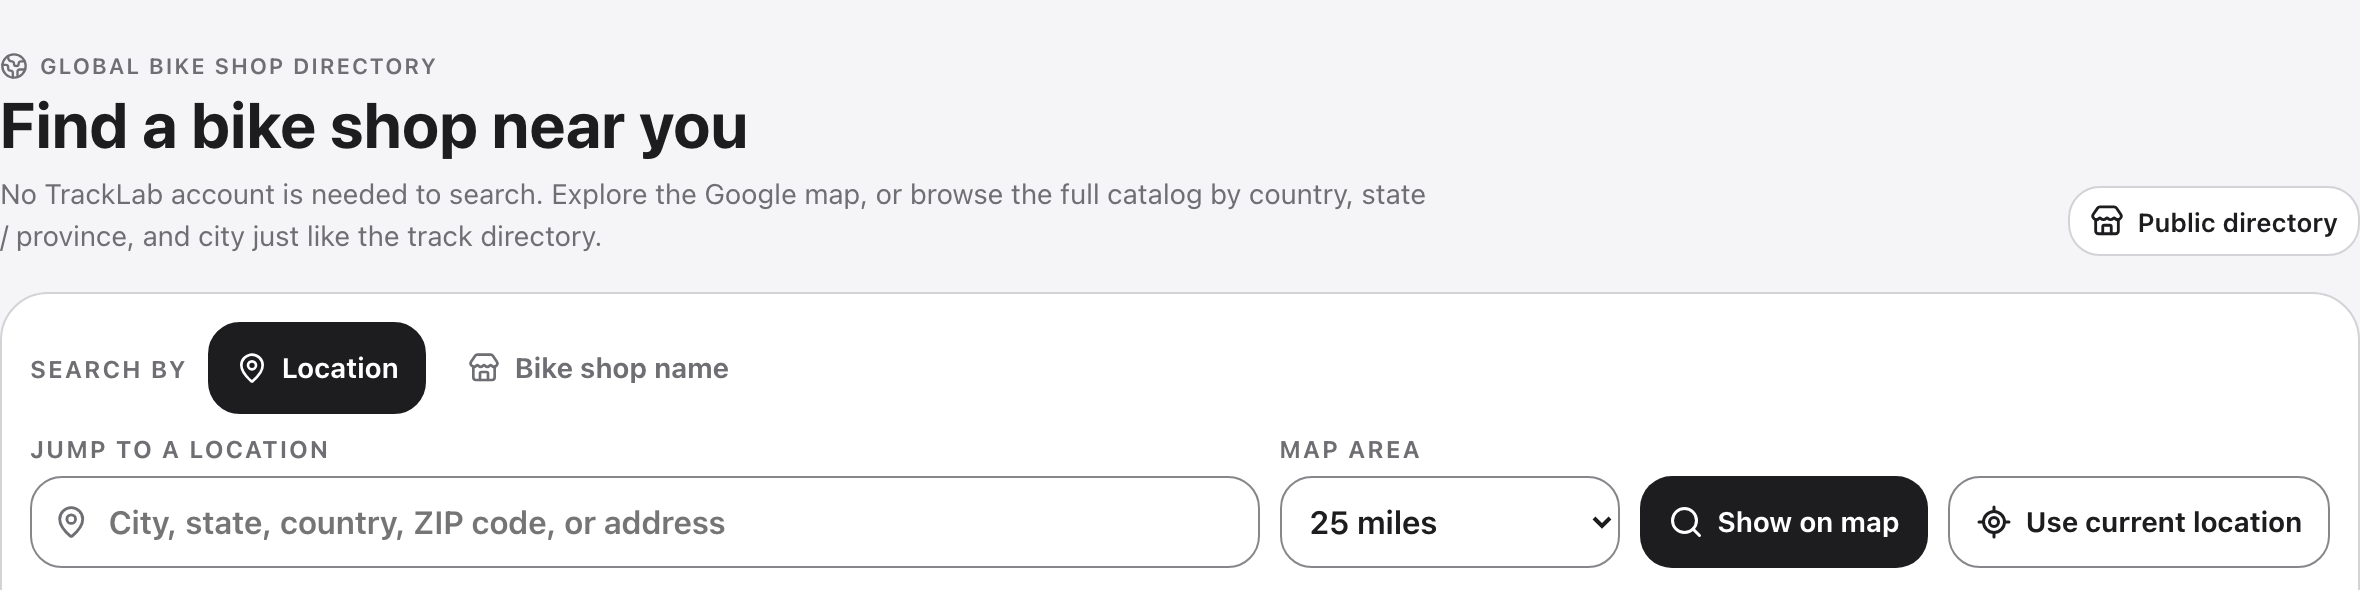
Bike shop search and location filters. Select the image to view full resolution.
Open Bike Shops and choose Location or Bike shop name. Location accepts a city, state, country, ZIP code, or address and offers suggestions as you type. Use current location searches around your device after you allow location access. Choose a map area from 5 to 50 miles.
You can also browse Country → State / province → City without entering a location. Load more shops when additional results are available. On the global map, move or zoom into an area; grouped markers open into smaller groups and individual shops as you zoom closer.
The result list stays available if the map cannot load. Listings combine a preloaded shop catalog with mapped directory sources, so available details and coverage vary. Dense views may ask you to zoom in for more results.
Go from a track to a shop, or a shop to a track
Planning a track visit and need parts or repairs? Track details show the closest three mapped bike shops within 25 miles. Select one to open its details, or choose View all nearby bike shops to browse the wider list around that track.
Starting with a shop instead? Its detail card lists BMX tracks within 50 miles. Select a track to see its satellite view, contact links, directions, and nearby shops. Distances describe proximity; use Directions to plan the actual journey.
TrackLab keeps your search context as you move between these views. In the same browser tab, returning from a track to the shop directory restores the retained results, selection, filters, map position, and scrolling. This browsing history is separate from your account’s saved track favorites.
Read shop details and request a claim
Select a shop to see its address, directory source, and available hours, phone, website, and services. Listed services may include bike sales, repairs, rentals, and e-bike service. Google Maps, Directions, and Street View links help you inspect the location. Check with the shop before relying on its hours or services.
A shop owner or authorized representative can sign in with a free account and choose Claim this shop. Submit the requested verification information, follow the request under My shop claims, or withdraw it while pending. Requests are reviewed before a listing receives its claimed and verified status.
TRACKLAB GUIDE
Race ghosts and review results
Keep online records, compare compatible runs, and learn from each completed session.
Race a recorded performance
Ghosts let you race recorded performances without another rider being online at the same time. Choose up to four compatible prior runs in Race a ghost, or use Race ghost on a friend with an available shared performance. Finish an eligible live Wattbike run to create a personal ghost.
Comparisons use matching course settings, including the route and lap configuration or the sprint distance and Air setting. A ghost from different settings may not appear in your current selection. Public live multiplayer is Coming soon during beta; compatible personal and shared ghost racing remains available.
Keep your records online
Eligible completed physical-bike sessions continue to upload race results, training history, and ghost recordings while you have the required access and connection. Beta Wattbike access supports these existing cloud records. Simulated demo sessions are for trying the app and do not become real athlete records.
Shared ghosts follow the existing sharing and privacy rules. A friend connection does not expose private training history, power, or heart-rate records. Expiring or revoking beta access does not delete saved history or cancel an active paid membership.
Review, compare, and export
Post-race analysis brings together finish times, reaction, cadence, speed, and results by zone and rider. The immediate review can be paused, extended by 20 seconds, or closed to return to the dashboard. Open Results to revisit saved sessions and the training results spreadsheet.
Race captures can be exported as CSV or JSON. Saved training results offer activity-specific sheets and workbook exports; private exports can include authorized heart-rate information when available. Shared race exports exclude private power. Choose the appropriate export for your own review or for sharing with someone else.
TRACKLAB GUIDE
Your profile, records, and privacy
See what follows your account, what stays on a device, and what an export contains.
Use the same account across devices
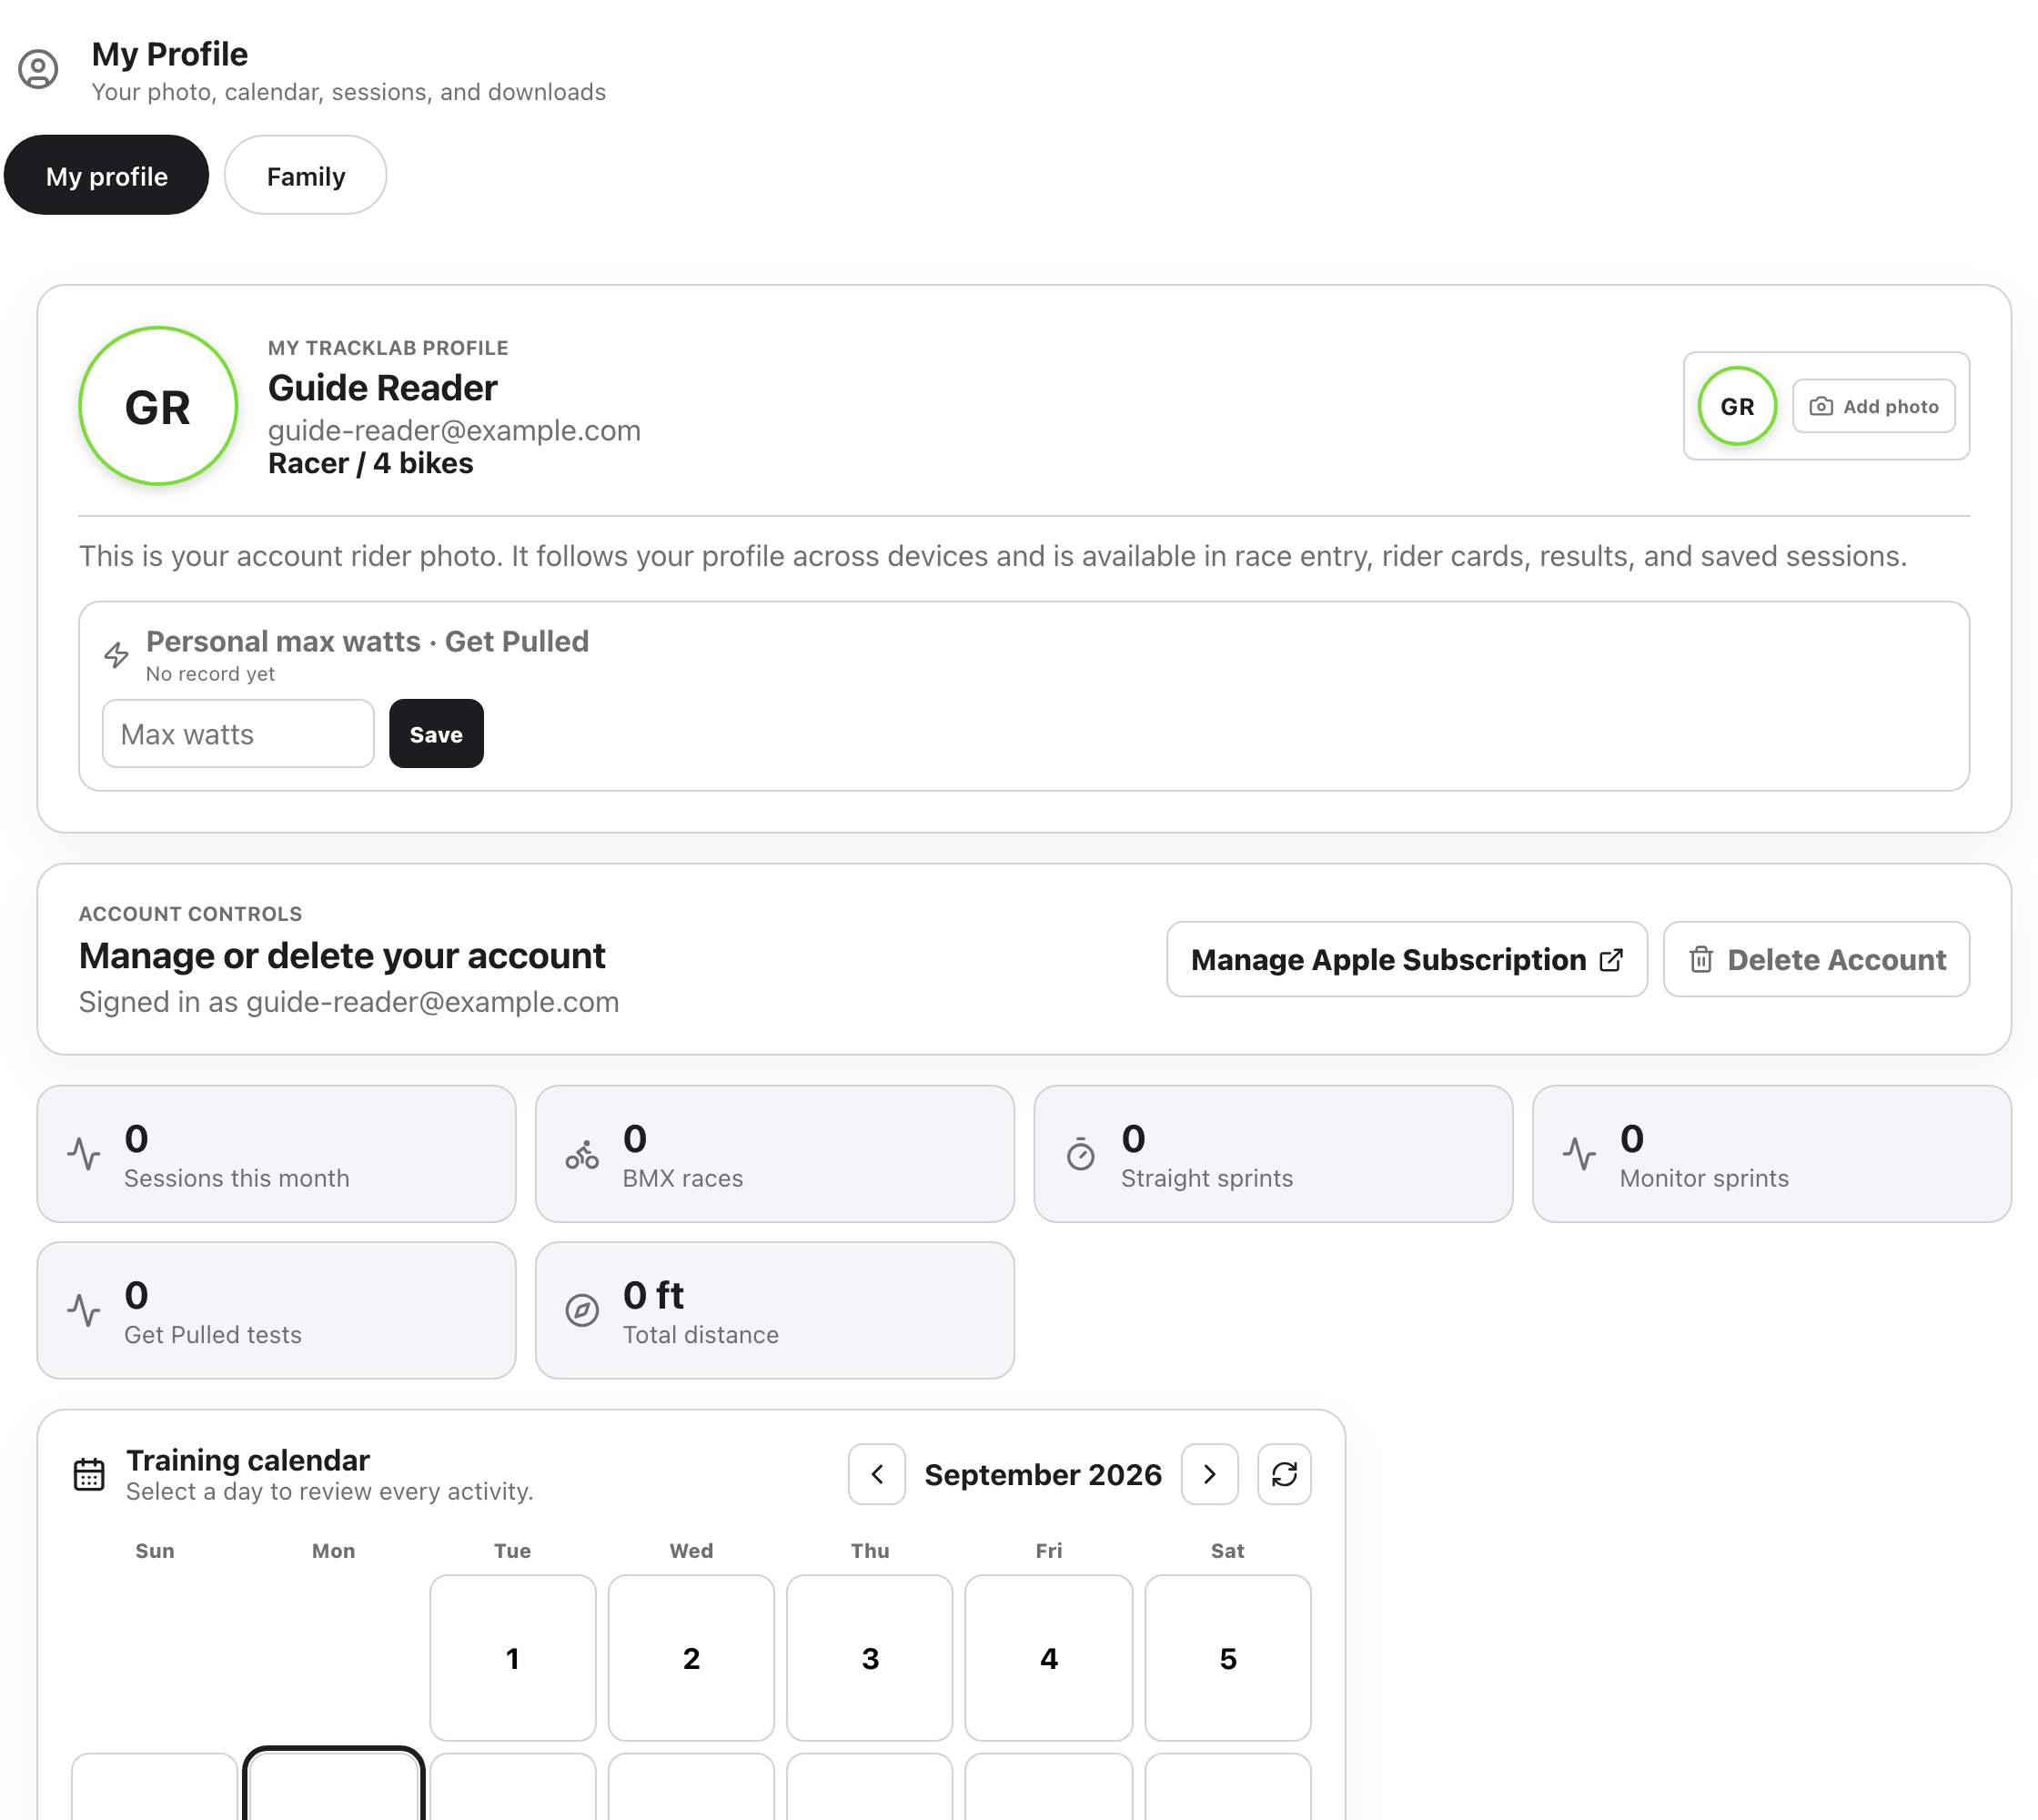
Example profile, account controls and the start of the training calendar. Select the image to view full resolution.
Cloud profile data includes your profile photo and supported personal records, display units, saved bike names and colors, and custom routes. Track mappings, studio riders, and camera preferences have role or administrator restrictions. Friends, favorites, training history, and recovery settings also use account services; they are not all stored in one profile document.
Saved training history covers supported BMX races, Straight Sprint, Explore rides, Get Pulled tests, and monitor sprints. Reaction Test keeps its separate personal best instead of adding each practice attempt to the training calendar. Demo races are not uploaded as your completed live race results.
Step by step
Sign in with the same account, then open My Profile to inspect saved history and records.
Finish a supported live activity while connected to the service, then confirm that its saved result appears.
On another device, sign in and refresh or reopen the profile. Check the cloud status if recent changes are missing.
Device storage and connection limits
Bluetooth permission and remembered native bike identifiers belong to each device. A synced bike name does not grant another device permission to connect. Pair there when prompted. Local browser storage provides fallback for some settings when cloud access fails, but not every setting or failed ride upload has guaranteed offline delivery. Confirm important results in cloud history before relying on another device to retrieve them.
Download the appropriate record
My Profile offers per-session JSON/CSV and daily Numbers/Excel workbooks. Standard training exports contain non-health training data. A separately labeled private workbook includes only authorized Apple Watch summaries. Shared race-capture exports remove private power; other riders’ ghost analytics also redact power. Your own authorized training records can contain your power metrics.
Apple Watch heart rate is private by default and excluded from public race, leaderboard, friend, and ghost data. Club access follows the rider’s authorization and sharing choices. A friendship alone does not grant access to heart rate.
TRACKLAB GUIDE
Parents and family athletes
One parent sign-in, separate athlete profiles, and a simple way to follow each child’s training.
Keep every child’s progress separate
Open My Profile → Family, or More → Family. Select a child by name to view that athlete’s profile, personal records, training calendar, and available session details. Select another name to change the view. Each child keeps a separate record; viewing a child does not sign you into their account or change the athlete recording your current workout.
Family monitoring uses your free parent account. Sign in with the same parent email on another device to see your family links. Adding children does not increase your Wattbike connection allowance or give a linked account a paid subscription.
Create a child profile without an email
A parent or guardian can create a managed child profile with a name. The child does not need an email address or password. On each child’s phone, the parent signs in, opens Family, selects that child, and confirms Use this device as that child. The parent session on that phone is replaced with child-only access. A one-use setup link is also available. Add each child separately, even when the same parent supervises several athletes.
For an athlete who trains at a TrackLab club, connect their unclaimed Club Connect invitation to the selected managed child. This attaches that exact athlete’s available studio records and future recorded club sessions without renaming the parent or moving another child’s history.
Step by step
Create or sign into your own parent account. Open My Profile → Family → Add child → Claim existing studio athlete.
Paste the athlete invitation link from your studio and choose Review athlete invitation. Check the athlete and studio names.
Create the child profile or choose that child’s existing managed profile. Confirm guardian authorization and choose Claim child’s profile. Available previous studio sessions and future recorded sessions remain connected to that athlete. Training days show a session count on the calendar.
For a sibling, return to Add child and use that sibling’s own invitation. Already-connected children do not need to be claimed again.
On the child’s device, sign in as the parent, open Family, select the correct child, and choose Use this device as that child. Confirm the name. The parent’s other devices keep parent access.
A child without studio records can use Create a new child profile. An athlete with an independent account uses permission sharing instead of reclaiming an already-claimed studio profile.
Adults, beta installation, and child device access
Adults open their club invitation and choose I’m the athlete, then create or sign into their own account and complete their athlete profile. A valid unclaimed invitation supports either path; no replacement link is needed just because the athlete is a child. Already-claimed independent accounts use the separate Family permission link instead of claiming the studio record again.
During the iOS beta, eligible parents and athletes install TrackLab through TestFlight using access provided by the beta organizer. Apple’s TestFlight terms do not permit children under 13 or the equivalent local minimum age to use TestFlight; a parent account does not bypass this rule. Younger athletes can use supported website features, while native Apple Watch access needs a suitable iOS distribution. Installing the beta and claiming a TrackLab athlete profile are separate steps. The child-phone setup link does not itself enroll an Apple account in TestFlight. Open the setup link after installing a build that supports child phone setup.
Only share a child-phone setup link with that child’s device. It expires in 15 minutes and can be used once. Creating another link replaces the pending one. From the selected child in Family, a parent can sign out the child’s devices without deleting records. Archiving a child also cancels their device sign-ins; restoring the profile requires assigning the device again or creating a new setup link.
A child’s Apple Watch and studio tablets
Use the child’s Apple Watch paired with the child’s own iPhone. On that iPhone, sign into the child’s TrackLab profile, open Watch Connect, and complete the Watch permissions and trusted-device setup. Watch data belongs to the child’s profile, not the parent’s account.
For studio use, connect the child’s exact Club Connect roster record, then choose the studio in Watch Connect and approve the live and saved-session sharing you want. The relay is Watch to the child’s iPhone to TrackLab to the authorized studio tablet. Select that same athlete on the tablet. Another athlete’s selection must not show the child’s readings. A working network connection is needed for cloud sharing.
Studio Watch sharing is separate from parent Family access. Family does not expose private heart-rate data. Apple Watch configured through a parent’s iPhone using Apple’s family setup is a different arrangement and is not verified by this child-iPhone workflow.
Link an existing athlete account with approval
If your child already has an account, create a family invitation and share its personal link with them. They open it while signed into their own TrackLab account and explicitly approve sharing their profile and training activity. Entering someone’s email or name alone never grants access. Invitations expire and can be accepted only once.
The athlete can remove sharing from their own Family view, and the parent can remove an existing-account link. Unlinking leaves the athlete’s independent account and records intact.
Archiving a managed child hides that profile while preserving its records and club connection. Open Archived child profiles and choose Restore to bring it back. A removed link to an independent account requires that athlete’s approval again.
Understand the records and permissions
Family activity views include supported BMX Race Intervals, Straight Sprint, Explore the World, Get Pulled, and monitor-sprint records, with available times, distance, cadence, speed, cycling power, and personal bests. Use the date and activity controls to review sessions and download available training exports. Reaction Test appears through its personal best rather than a calendar entry for every practice attempt.
Family access covers the selected athlete’s authorized training data. It does not expose another rider’s records, the athlete’s entire club roster, account password, billing, Friends messages, live location, or private Apple Watch heart rate. The parent’s Watch is never substituted for the child’s readings.
A parent-managed child’s phone records personal training under that child’s existing profile. The parent’s Family view refreshes saved activity while open; results sync when devices are online. The Family selector on the parent’s phone only changes the records being viewed. It never changes who records the parent’s workout. Studio-attributed sessions remain visible to the connected club under the same roster athlete.
TRACKLAB GUIDE
Apple Watch and recovery
Add optional heart rate and recovery reminders to supported training.
Connect Apple Watch through its paired iPhone
Training works without Apple Watch. For heart rate, set up Watch Connect on the paired iPhone and approve the requested Apple Health permissions. The remembered connection runs for four hours; start another connection on the paired iPhone when it ends. Keep the iPhone and Watch nearby and online. An iPad can receive readings through the iPhone relay.
Personal account recording attaches private heart-rate windows to supported sessions. Studio Watch enrollment asks for training-summary consent; live BPM sharing is a separate choice. Shared summaries contain minimum, average, peak, coverage, and supported zone summaries, not raw samples. Check signal and coverage indicators if readings are interrupted. Use the workout controls to end and save the workout to Apple Health when offered.
Set Recovery Alert
Recovery settings save to your account for Race Intervals, Straight Sprint, and Get Pulled. Choose Off, Timer, Heart rate, or Smart, adjust the settings, and save. Timer recovery begins at the recorded finish. Heart-rate recovery uses a fresh Watch reading held at the target for 12 seconds, with the configured timing fallback when readings are unavailable.
Smart recovery begins with your chosen time and learns from clean recovery episodes and aggregate effort data. It is a training estimate, not a measurement of breathing or a medical assessment. Recovery alerts never start the next repetition for you. Background Apple notifications and Watch taps require compatible native support and device permissions; the in-app alert remains available.
TRACKLAB GUIDE
Membership and Wattbike access
Understand free accounts, temporary beta access, and Apple subscriptions when available.
Start with a free account
Free membership includes public track and mapped bike shop directories, Reaction Test, a community profile, and saved track favorites. Sign in to keep account features associated with your profile. Live personal Wattbike training requires active Racer access, which can come from automatic public beta enrollment, an individual beta invitation, or a verified subscription when purchasing is available.
An athlete can view and download their claimed club training history without buying a personal bike connection. Training through an enrolled club uses that club’s available capacity. Personal pairing at home requires your own active Wattbike access.
Choose a connection plan when purchasing is available
TrackLab’s Apple subscription options are auto-renewing monthly plans for one, two, three, or four simultaneous Wattbike connections. These are connection allowances, not a promise of unlimited bikes on every device. Use the current access and capacity messages to check what is available to your account.
Purchases require the native iPhone or iPad app, a completed signed-in profile, an available App Store price, and a ready subscription service. The app displays Apple’s localized price before purchase. If it says billing is being configured or the price is unavailable, purchasing is unavailable; no price is implied by this guide.
Step by step
Sign in to the TrackLab account that should receive access.
Open membership options, select the needed connection count, and review Apple’s displayed price and subscription terms.
Complete the Apple purchase when enabled. Sign in with the same TrackLab account on another supported device to use its verified capacity.
Restore, manage, or cancel
Use Restore Purchases in the native app when available to verify an existing purchase with Apple. Use the purchasing Apple Account and the intended TrackLab account. Restore is also unavailable while TrackLab’s subscription verification service is not ready.
Manage Subscription opens Apple’s subscription controls. Apple manages renewal and cancellation; deleting TrackLab or its account does not cancel Apple billing. Access follows the entitlement Apple verifies, including its expiration or an applicable verified grace period. An active beta grant can continue to provide its own allowance after paid access ends.
TRACKLAB GUIDE
Build your community and train with a club
Connect with riders you know and use the studio tools available to your role.
Find friends and share tracks
Friends brings together your connections, received and sent requests, trusted suggestions, and shared tracks. Ordinary friend requests require approval. Create a secure personal invitation or QR code to connect with someone you know; invitation links are single-use, expire automatically, and can be revoked.
Rider discoverability is off by default. Turn on Appear in rider search and trusted suggestions if you want to be found that way; personal invites work either way. Eligible online friends may offer Talk live, and friends with a shared performance can offer Race ghost. Use the Shared tracks inbox to open locations sent to you.
Use More on a rider card to unfriend, block, or report. Blocked riders cannot find you or interact with your TrackLab activity. Explicitly accepted friends can see online presence, but friendship does not grant access to private rides, live location, or training history.
Use an authorized club tablet
An enrolled Club Tablet keeps its Wattbike pairing while athletes take turns. Choose the athlete and activity in either order. Claimed and unclaimed club profiles can train, and completed results stay with the selected athlete. Ending the athlete session clears that identity while retaining the tablet’s bike pairing.
Independent Training lets riders choose their own activity. A club owner’s Studio Tablet Monitor shows authorized tablet, bike, athlete, and session status, with live metrics and temporary read-only activity views. The owner does not need to keep the monitor open for the athlete’s bike access to work.
Follow a managed studio session
Authorized club owners also have Studio Race controls for a managed 2–4-rider BMX or Straight Sprint session. The owner chooses the course and settings, checks tablet readiness, and starts or ends the event. Ready tablets receive the same configured activity.
These club tools depend on owner authorization, enrolled tablets, and the selected athlete’s session. They are separate from public live multiplayer, which remains Coming soon during beta. A regular beta invitation supplies its stated Wattbike access; it does not turn a tester into a club owner or administrator.
TRACKLAB GUIDE
Questions and troubleshooting
Answers to common setup, riding, family, data and billing questions.
Do I need a Wattbike to try TrackLab?
No. Track and shop discovery and Reaction Test can be explored without riding hardware. Real connected training needs a compatible Wattbike monitor and active bike access.
Does joining the Preski Labs waitlist install the app?
No. The waitlist records interest. A TestFlight invitation or available public TestFlight link handles installation. Your TrackLab sign-in is a separate account step.
Can I forward the public TestFlight link?
Yes, when it is enabled and has an approved compatible build. Keep athlete-claim and child-phone links private: those are for a specific profile or device setup.
Does every tester need a paid plan?
No. While public beta enrollment is open, sign-in automatically grants up to four simultaneous bike connections. Check the date and allowance in Beta Testing. Expired or revoked access is not restarted by signing in again.
Will beta access charge me when it expires?
Beta access does not automatically turn into a subscription. An independently purchased Apple subscription follows its own renewal terms.
Can I train at home or in another country?
Yes, where the supported bike connection and internet services are available. Your device must be near the bike. Monitor compatibility and service availability still apply.
Can I pair from Safari on an iPad?
Not directly to the Wattbike through the website. Use the native TrackLab iPhone/iPad app for native Bluetooth pairing.
My bike is paired but the rider does not move. What should I check?
Pedal in Just Ride and confirm that both watts and cadence change. A connected label alone is not enough. Wake the monitor, check its wireless setting, and close another app that may be holding the connection. Explore needs fresh power and cadence.
Does TrackLab control the air resistance?
No. AIR values guide or record your physical lever setting. Move the lever yourself; the app does not motorize it.
Can four devices each connect four bikes on one account?
Do not assume that. The allowance is for simultaneous connections on the account, up to four, and the app’s capacity controls apply. Pairing permissions are also device-specific.
Can every track in the directory be raced?
No. The worldwide discovery directory is broader than the collection of courses with saved race mappings. Choose a mapped course offered in the training activity.
Why is a sprint distance unavailable?
The saved route may be too short for that distance. Select a shorter supported distance or another saved venue. Creating or editing venues is an administrator feature.
When does Get Pulled start timing?
After the six-second countdown, timing waits for the first monitor power signal of at least 1 watt. If it remains waiting, verify the bike’s live power input.
Should I wait for green in Reaction Test?
Timing starts at the first red tone in this TrackLab drill. Respond after the first red signal. The stopped light identifies where you reacted; this is not a green-only traffic-light test.
Why can’t I hear the gate?
Start the test with a deliberate tap, check device volume and the current audio output, and retry. If it persists, report device, OS and build, and whether other app sounds work. A screenshot cannot verify audio.
Why is a personal ghost missing?
Ghosts must match the current course and configuration. Check route, laps, or sprint distance and Air setting. A simulated demo or unfinished run is not an eligible real recorded ghost.
Does another athlete have to be online for ghost racing?
No. A ghost is a compatible recorded performance. It does not require simultaneous live multiplayer.
Can Smart Route exactly reproduce any event stage?
No exact-match guarantee is made. Describe the event, year and stage, then review the generated route, distance and available research sources. Refine your request if it is not what you intended.
Can I use Explore as outdoor turn-by-turn navigation?
No. It is an indoor virtual riding experience using mapped routes. Review the selected virtual route before starting.
Why did editing my destination not change the ride?
Choose Build again after changing locations. Review the new map before starting. Typing a new destination alone does not rebuild the route.
What is the difference between Recent routes and saved rides?
Recent routes stores up to eight route plans for reuse. Completed training history stores eligible finished rides. A same-device recovery checkpoint is separate and resumes unfinished local progress.
Will a paused ride resume on a different phone?
Do not rely on that. Unfinished Explore recovery checkpoints use the original device’s storage. Completed cloud history is available through the account, but a checkpoint is not a cross-device ride handoff.
Where are nearby shops for a BMX track?
Track details show up to three mapped shops within 25 miles and a wider nearby-shop link. A shop detail shows nearby BMX tracks within 50 miles. These are proximity distances, not driving-route lengths.
Are shop hours and contact details guaranteed current?
No. Coverage varies by directory source. Check the official website or call before traveling. Maps and directions help plan the trip.
How does an adult claim an existing studio profile?
Use that athlete’s valid studio invitation and choose I’m the athlete. Sign into the intended personal account. Avoid creating a second profile for the same athlete.
How does a parent claim a child’s studio profile?
Choose I’m the parent or guardian on the invitation and sign into the parent account. Choose or create the correct managed child, then claim the exact studio record.
Does a child need their own email?
A parent-managed child does not. The parent creates a one-use child-phone setup link. Open it on the intended child device within 15 minutes and confirm the name.
Does selecting my child in Family record my workout as theirs?
No. The Family selector changes whose records you view. It does not change the signed-in athlete recording a workout on the parent phone.
What if my child already has an independent account?
Use Family permission sharing with that account’s explicit approval. Do not create a duplicate or attempt to reclaim an already-claimed studio record.
Can two children share one parent email?
The parent can supervise separate managed child profiles from one parent account. Each child keeps their own identity and history. Select each child separately and issue their own device setup link.
Will my child’s Watch pair directly to the studio iPad?
The supported workflow keeps the Watch paired to the child’s iPhone. With explicit sharing enabled, data relays through that phone and TrackLab to the authorized studio tablet.
Can parents automatically see Apple Watch heart rate?
No. Family training access and private Watch health sharing are separate. Family views do not expose private heart-rate data.
Can I train without an Apple Watch?
Yes. Watch features are optional. Recovery can use a timer; heart-rate-based recovery needs fresh authorized readings or its configured fallback.
Where should a missing result be checked?
Confirm the signed-in athlete, the assigned rider, completed activity, date filters and cloud connection. Reopen the correct profile. Demo sessions do not count as real training records; Reaction Test uses a separate personal best.
Does every failed upload retry forever offline?
No guaranteed offline delivery is promised. Confirm important results in cloud history before relying on another device to retrieve them.
What should I include in a bug report?
Include device and OS, app build, native app or browser, activity, bike monitor and firmware, connection method, approximate time, exact steps, expected result and actual result. Share screenshots without private child or health information.
How do I cancel a paid subscription later?
Use Apple’s subscription management controls. Deleting the app or TrackLab account does not cancel Apple billing. Restore Purchases requires the purchasing Apple Account and the intended TrackLab account.
Does a recovery alert start the next repetition?
No. It alerts you; you choose when to start the next effort. Smart recovery is a training estimate, not a medical assessment.
Still need a hand?
Use TestFlight feedback or email preskiranch@gmail.com. Include your device, build, activity and steps. Never include passwords or private setup links.